
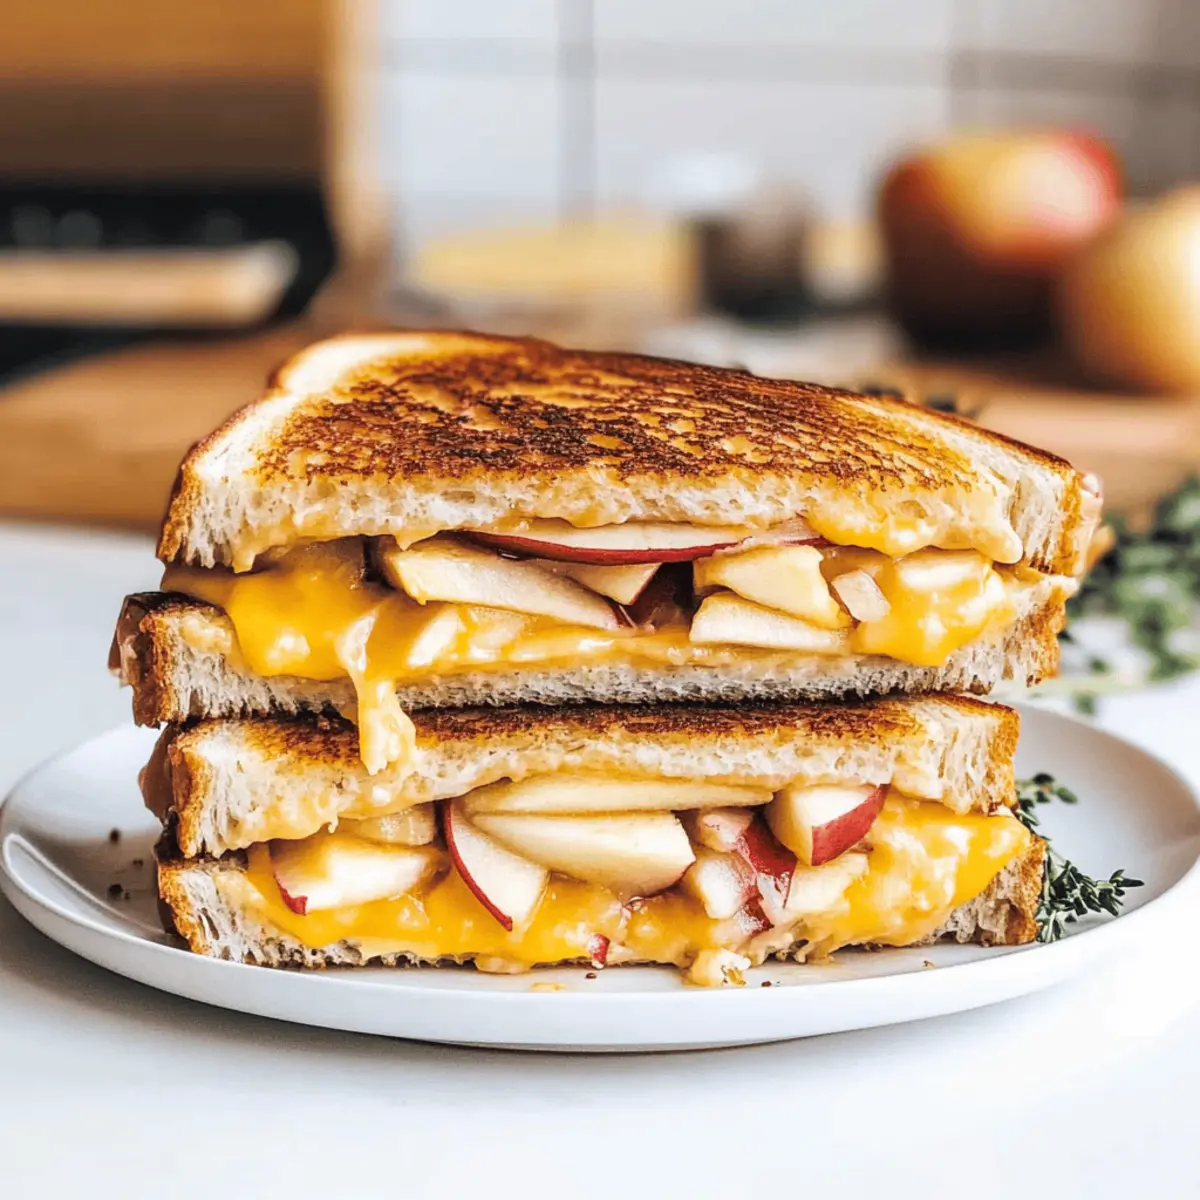
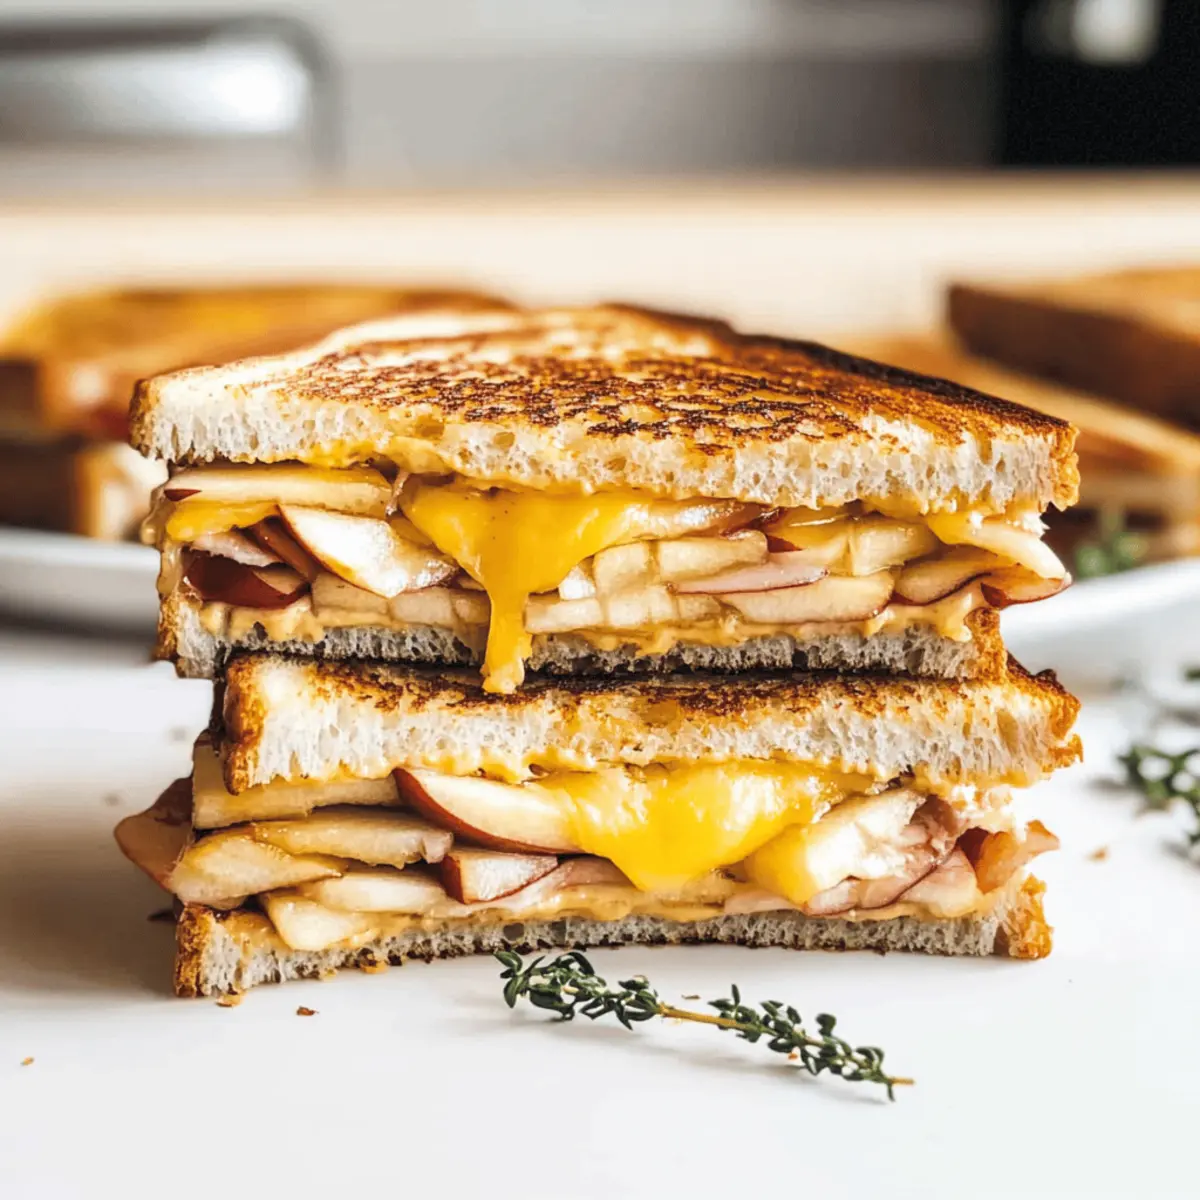
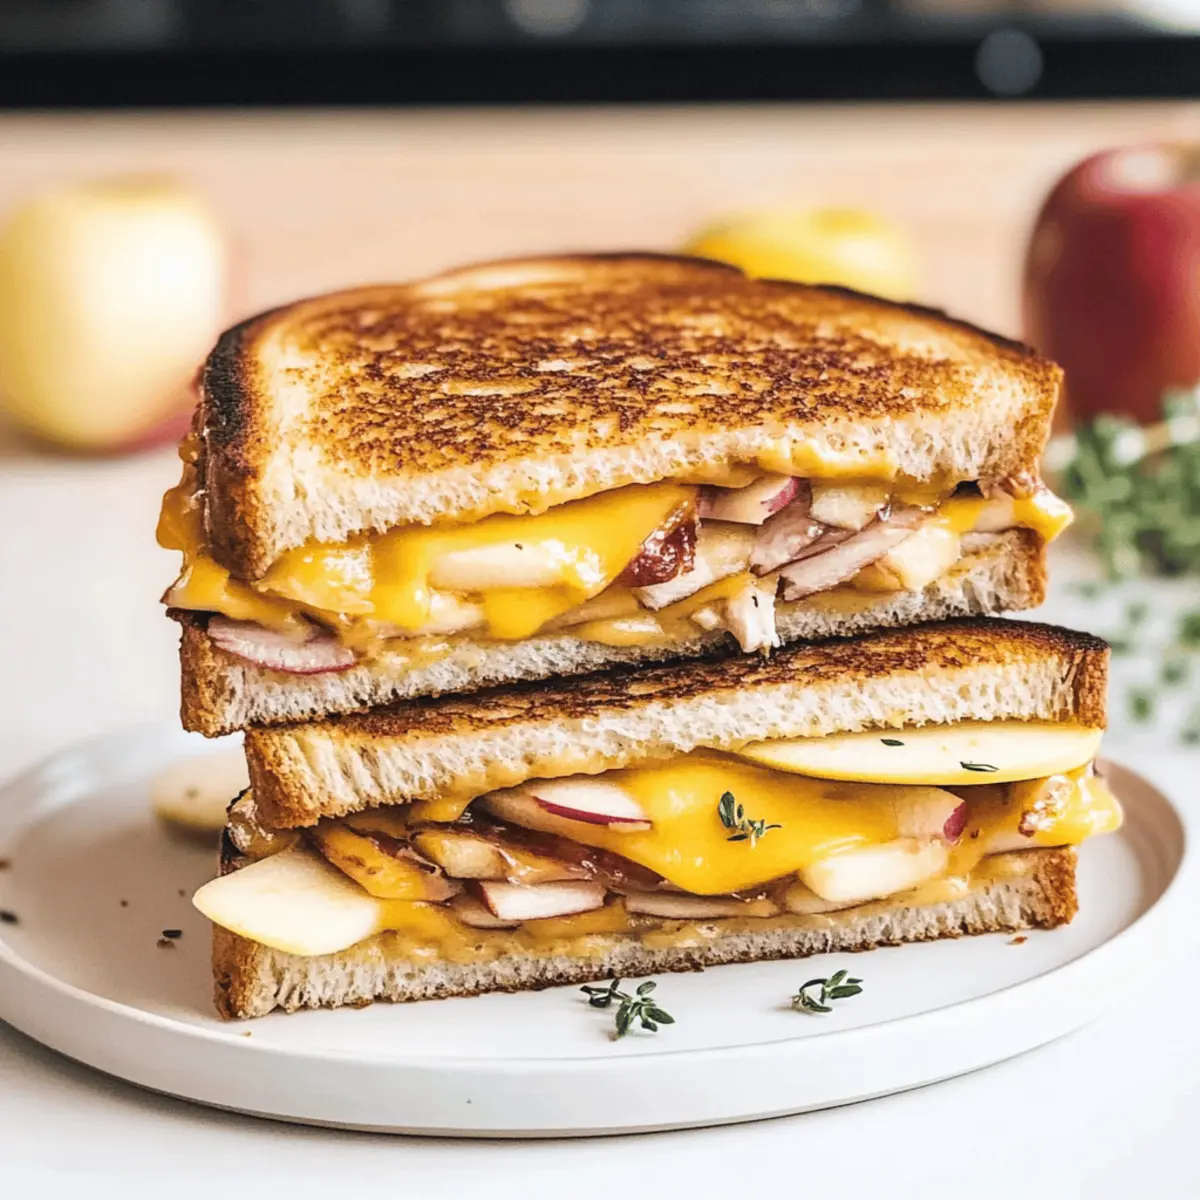
As I stood in the kitchen, the crisp autumn air seeped in, mingling with the irresistible aroma of toasted bread and melted cheese. It’s the perfect season for comfort food, and let me tell you, nothing beats the nostalgic flavors of an Apple Grilled Cheese with Turkey. This delightful creation combines tangy Granny Smith apples, creamy sharp cheddar, and savory turkey, making for a quick dinner that warms the soul and tickles the taste buds. Plus, it’s incredibly easy to customize—swap in gluten-free bread or try different cheeses like Brie or Gouda for a fun twist. Whether you’re winding down after a long day or hosting a casual gathering, this comfort food classic will surely impress. Ready to dive into autumn’s flavors? Let’s get cooking!
Why Choose Apple & Cheddar Grilled Cheese?
Irresistible Flavor Mix: This recipe masterfully blends tangy apples and creamy cheddar, creating a mouthwatering symphony of flavors.
Quick & Easy: Perfect for hectic weeknights, it requires minimal prep, allowing you to whip up comfort food in no time.
Customizable Delight: Feel free to substitute with gluten-free bread or experiment with different cheeses like Brie or Gouda for a unique spin.
Comforting & Cozy: Capturing the essence of autumn, each bite invites you into the warmth of the season, reminiscent of cozy evenings.
Crowd-Pleaser: Whether family or friends, this Apple Grilled Cheese with Turkey is sure to impress everyone at the table. For a complete meal, pair it with a simple side salad or indulge in a rich Custard Apple Rice for dessert!
Apple & Cheddar Grilled Cheese Ingredients
For the Sandwich
• Whole Wheat Bread – A sturdy base for the sandwich; feel free to use gluten-free bread if desired.
• Apple Butter – Adds a sweet, rich depth to the layers; homemade or store-bought works perfectly.
• Chopped Fresh Sage – This herb adds wonderful aromatic notes; dry rubbed sage serves as a good substitute.
• Sharp Cheddar Cheese – Delivers a creamy, flavorful punch; white cheddar can also be used for a twist.
• Firm Tart Apple (e.g., Granny Smith) – Provides a satisfying crunch and refreshing tartness; Fuji or Honeycrisp apples are excellent alternatives.
• Good-quality Deli Turkey Meat – Adds a hearty protein element; swap with chicken or omit for a vegetarian version.
• Light Butter Spread – Useful for achieving that perfect grill; regular butter is just as effective.
For Serving
• Simple Side Salad – A fresh accompaniment to enhance the meal experience.
• Roasted Vegetables – Pairing with roasted veggies makes it a complete, hearty dinner option.
Step‑by‑Step Instructions for Apple & Cheddar Grilled Cheese
Step 1: Heat the Skillet
Begin by heating a nonstick skillet over medium-low heat. Alternatively, you can preheat a panini press to medium-high. This gentle heat helps achieve a perfectly toasted exterior without burning while ensuring the cheese melts beautifully within your Apple & Cheddar Grilled Cheese.
Step 2: Spread the Apple Butter
Take two slices of whole wheat bread and generously spread 1 tablespoon of apple butter on one side of each slice. This sweet and tangy layer sets the foundation for your sandwich. Make sure to cover the surface evenly for a delightful burst of flavor in every bite.
Step 3: Assemble the Sandwich
Flip the slices so the apple butter is facing up. On one slice, sprinkle half of the chopped fresh sage, then layer half of the sharp cheddar cheese, a couple of thin apple slices, and a few slices of turkey. Finally, place the other slice of bread on top, apple butter side down, pressing gently to secure the layers.
Step 4: Butter the Bread
Spread a light layer of butter on the outer side of each slice of bread. This will create a savory and crispy crust when grilled. Ensure the butter is evenly distributed for an irresistible golden-brown finish on your Apple & Cheddar Grilled Cheese.
Step 5: Grill the Sandwich
Carefully place the assembled sandwich in the preheated skillet or panini press. Grill for about 2-4 minutes per side, checking for a golden-brown color and a slight crispness on the bread. The cheese should start melting and become gooey, ensuring a satisfying bite.
Step 6: Slice and Serve
Once your sandwich is beautifully toasted, remove it from the skillet or press. Let it cool for a minute before slicing it in half for easier handling. Serve hot, and feel free to pair it with a simple side salad or roasted vegetables to make your meal a complete experience!
Storage Tips for Apple & Cheddar Grilled Cheese
Room Temperature: Enjoy your Apple & Cheddar Grilled Cheese immediately for the best flavors and texture. If storing, limit it to just 2 hours at room temperature.
Fridge: Leftover sandwiches can be kept in an airtight container in the fridge for up to 1 day. Keep them wrapped tightly to maintain freshness and prevent them from drying out.
Freezer: For long-term storage, wrap individual sandwiches in plastic wrap and then in foil. They can be frozen for up to 2 months.
Reheating: When ready to eat, reheat in a skillet over low heat to restore the sandwich’s crispy exterior and gooey cheese. Avoid the microwave to prevent sogginess.
Apple & Cheddar Grilled Cheese Variations
Feel free to get creative with this recipe and personalize it to your taste buds—your kitchen, your rules!
-
Dairy-Free: Swap cheddar with a plant-based cheese to create a delicious vegan treat, perfect for those with dairy sensitivities.
-
Gluten-Free: Use a gluten-free bread to cater to dietary preferences without sacrificing flavor or texture, ensuring everyone can enjoy this comfort classic.
-
Herbed Delight: Add fresh herbs like thyme or rosemary for a fragrant touch, elevating your grilled cheese to gourmet status.
-
Sweet Twist: Drizzle honey over the apple slices for a sweet contrast that amplifies the flavors beautifully, making each bite a delightful surprise.
-
Spicy Kick: Include sliced jalapeños or a sprinkle of red pepper flakes to give your sandwich a zesty kick, adding an unexpected burst of heat.
-
Cheese Variations: Try Brie or Gouda in place of cheddar for a rich, creamy experience. Each variation plays with flavor profiles in unique ways, inviting you to discover your favorite.
-
Chunky Style: For a heartier bite, add a layer of sautéed onions or mushrooms inside the sandwich, enhancing the overall taste and texture wonderfully.
-
Nutty Crunch: Throw in some toasted walnuts or pecans for added crunch that pairs perfectly with the apples and cheese, making every mouthful a delightful adventure.
Feel inspired? Why not take a moment to enjoy this cozy dish alongside a simple side salad or indulge in a comforting dessert like Custard Apple Rice? The possibilities are endless!
Make Ahead Options
These Apple Grilled Cheese with Turkey sandwiches are perfect for busy home cooks looking to save time during hectic weeknights! You can prepare the sandwiches (up to 24 hours in advance) by assembling them without grilling. Simply spread the apple butter, layer the sage, cheese, apples, and turkey between the slices of bread, then butter the outside. Wrap each sandwich in plastic wrap and refrigerate to maintain freshness. When you’re ready to enjoy, heat your skillet or panini press and grill until golden brown, about 2-4 minutes per side. This simple make-ahead option ensures that your comfort food remains just as delicious while saving you precious time!
What to Serve With Apple Grilled Cheese with Turkey?
The perfect meal isn’t just about the main dish; it’s about creating a delightful experience from start to finish.
-
Crispy Side Salad: A refreshing mix of greens and a tangy vinaigrette brightens each bite, balancing the rich flavors of the sandwich.
-
Roasted Vegetables: Caramelized carrots and Brussels sprouts add a hearty, savory touch. Their sweetness complements the apple while adding a comforting texture.
-
Butternut Squash Soup: This creamy, velvety soup enhances the autumn vibes and creates a warm embrace on your palate—perfect for dipping!
-
Sweet Potato Fries: Their natural sweetness and crunch provides a delightful contrast, perfect for those who enjoy a playful twist with every bite.
-
Apple Cider: Enhance the fall essence with a glass of spiced apple cider. This drink echoes the apple flavor, making every sip a cozy experience.
-
Pumpkin Spice Cookies: For dessert, these cookies offer a soft, sweet finish to your meal. Their warm spices beautifully tie together the seasonal flavors.
-
Herbed Quinoa: Light and nutritious, this side adds a nutty texture. Its freshness balances the heartiness of the grilled cheese while keeping it wholesome.
Expert Tips for Apple & Cheddar Grilled Cheese
-
Perfect Temperature: Cook on low heat to ensure the cheese melts thoroughly without burning the bread. This prevents a rushed, uneven melt.
-
Even Buttering: Spread a generous layer of butter on the outside of each slice. This not only enhances flavor but also creates that coveted golden crust.
-
Freshly Grated Cheese: Opt for freshly grated sharp cheddar instead of pre-packaged. It melts better and provides a creamier texture for your Apple & Cheddar Grilled Cheese.
-
Avoid Soggy Bread: Don’t overload on apple slices or apple butter; too much moisture can make the sandwich soggy. Balance is key for optimum texture.
-
Herb Variations: Experiment with herbs like thyme or rosemary in addition to sage for added flavor depth. Each brings a unique aroma that enhances the grilled cheese experience.
Apple & Cheddar Grilled Cheese Recipe FAQs
How do I choose the right apples for my sandwich?
Absolutely! For this recipe, aim for firm tart apples like Granny Smith, which balances the sweetness of the apple butter and cheese perfectly. Look for apples that are brightly colored and free from dark spots or bruises. Alternatively, Fuji or Honeycrisp apples can offer a sweeter profile, adding a lovely twist to your grilled cheese.
How should I store leftover Apple & Cheddar Grilled Cheese?
Very! If you have any leftovers, store them in an airtight container in the fridge for up to 1 day. Wrap them tightly to prevent them from drying out and losing that delicious, gooey texture. Just remember not to leave them at room temperature for more than 2 hours.
Can I freeze my grilled cheese sandwiches?
Yes, you can! To freeze your Apple & Cheddar Grilled Cheese, wrap each sandwich individually in plastic wrap and then in foil to prevent freezer burn. They can be stored in the freezer for up to 2 months. When you’re ready to enjoy them, reheat in a skillet over low heat to restore that crispy exterior and melty cheese charm.
What if my grilled cheese isn’t melting properly?
If you’re having trouble with the cheese melting, make sure you’re using low heat while grilling; this allows the cheese to become gooey without burning the bread. Pre-grated cheese often contains anti-caking agents that can affect melting, so I recommend opting for freshly grated sharp cheddar instead for a perfect melt!
Are there any dietary considerations I should be aware of?
Yes, always good to ask! If you’re cooking for someone with gluten sensitivity, substitute the whole wheat bread with gluten-free bread. Additionally, you can swap the deli turkey for grilled chicken or omit it entirely for a vegetarian option. Also, check that your apple butter is free of allergens if that’s a concern. Enjoy customizing!
Can this recipe be made ahead of time?
Certainly! You can prepare all your ingredients in advance—slice the apples, mix the apple butter, and even assemble the sandwiches ahead of time. Just keep them wrapped tightly in the fridge until you’re ready to grill. This makes it perfect for a quick weeknight meal without sacrificing flavor!

Savory Apple & Cheddar Grilled Cheese for Cozy Nights
Ingredients
Equipment
Method
- Heat a nonstick skillet over medium-low heat or preheat a panini press to medium-high.
- Spread apple butter on one side of each slice of bread.
- Assemble the sandwich by layering sage, cheddar, apple slices, and turkey on one slice and covering with the other.
- Spread a light layer of butter on the outer sides of the sandwich.
- Grill the sandwich for 2-4 minutes per side until golden-brown and the cheese is melted.
- Slice the sandwich in half after letting it cool for a minute, then serve hot with sides.
Leave a Reply