
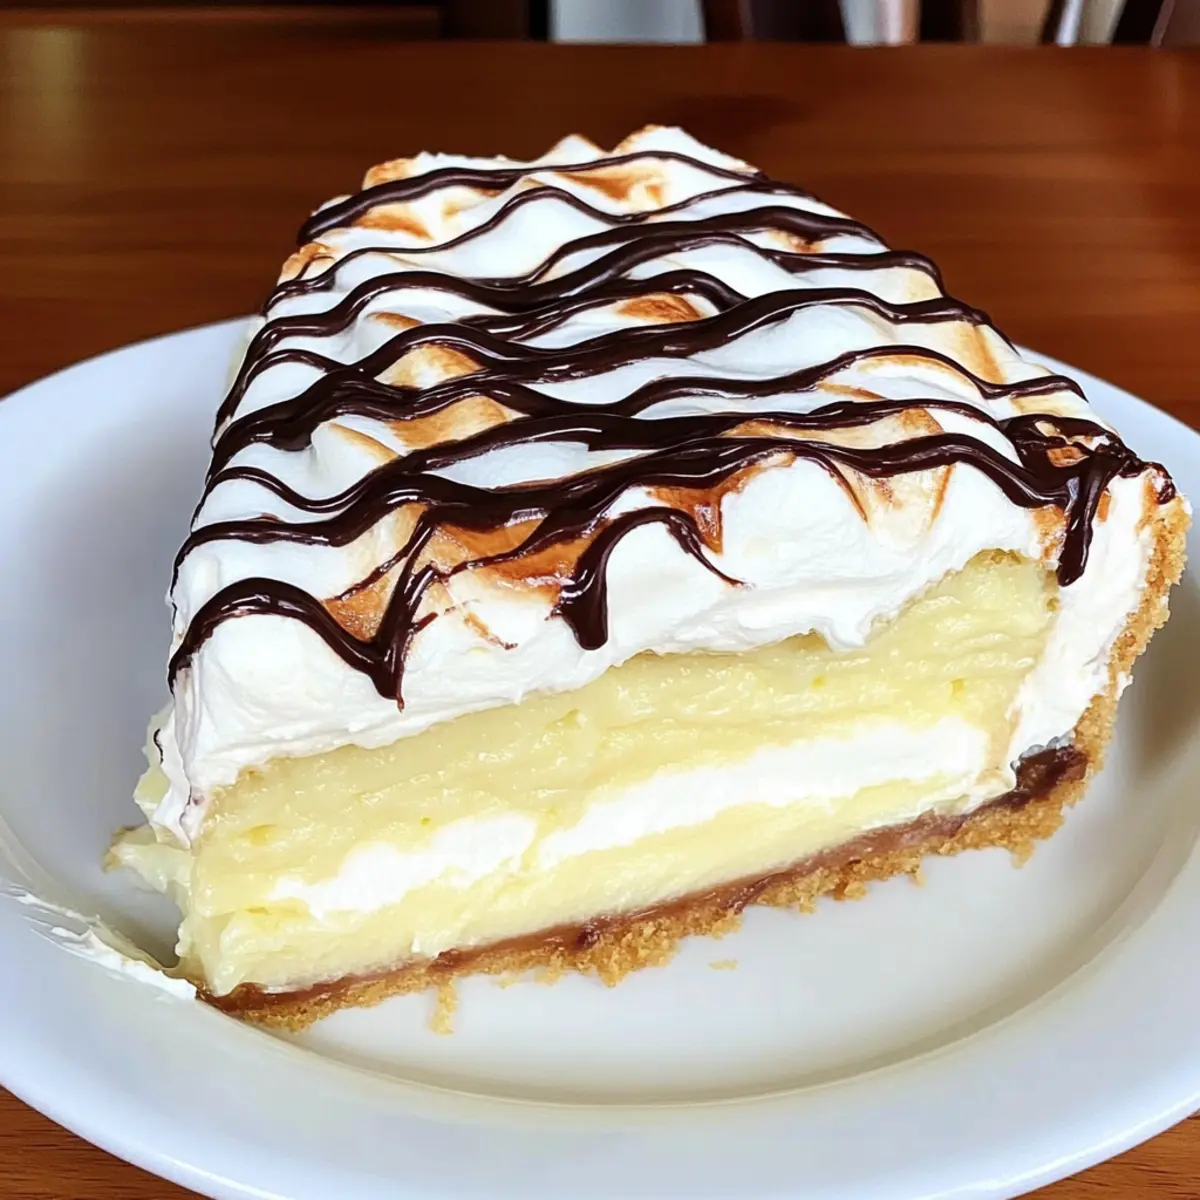
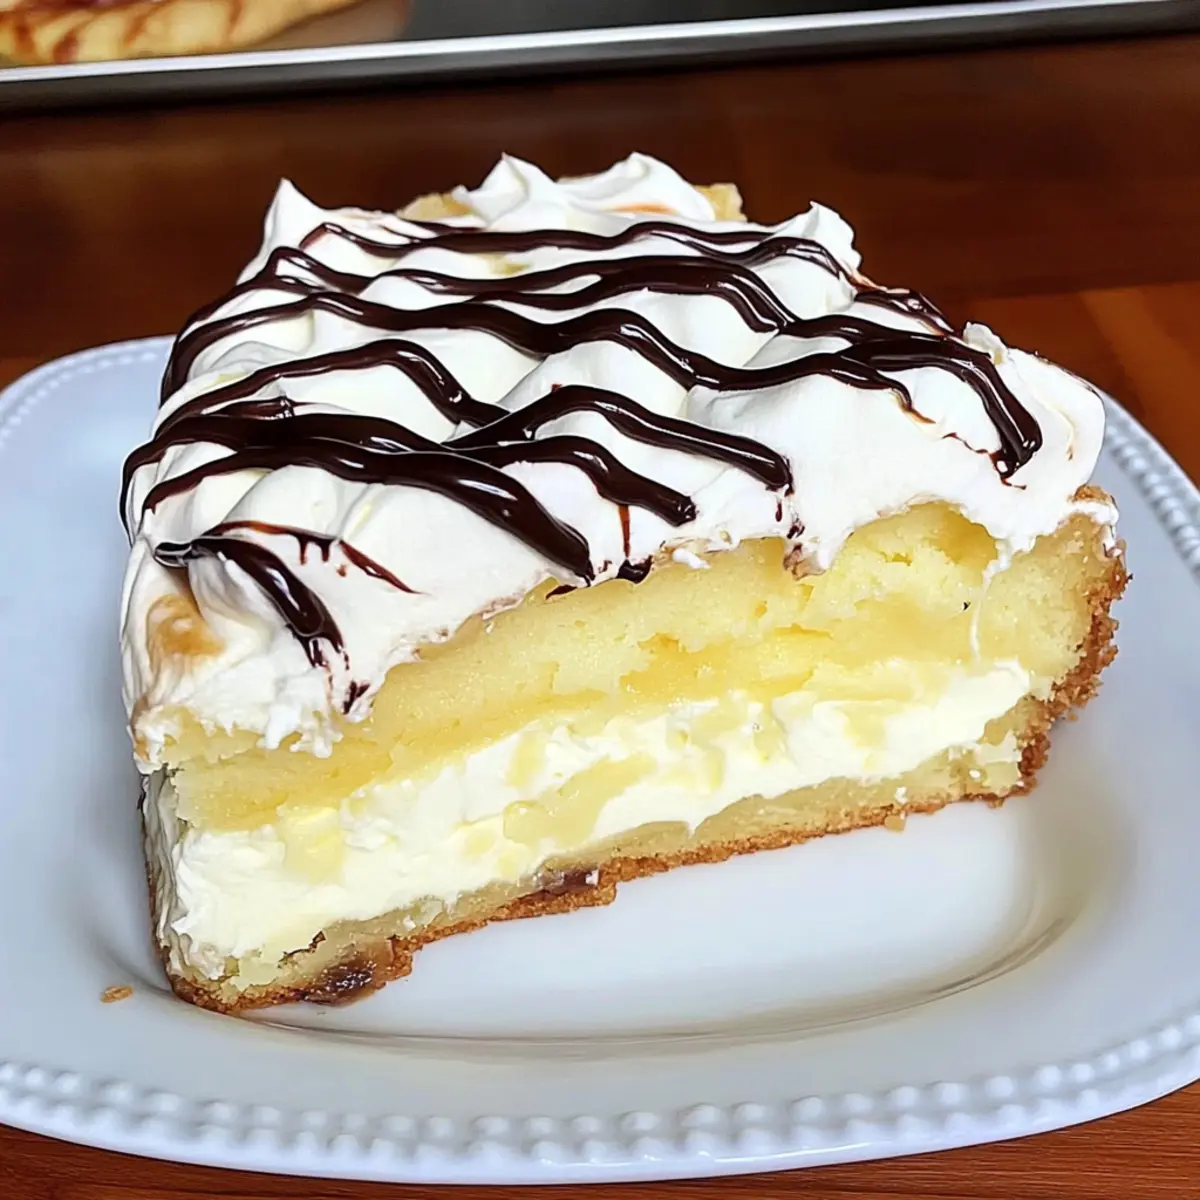
As I pulled the Cream Puff Cake from the oven, I couldn’t help but smile at the beautiful golden-brown pastry that had magically risen to perfection. This delightful treat combines the light, airy texture of cream puffs with a rich and creamy filling, offering an easy dessert that feels utterly indulgent without the bakery price tag. In just 20 minutes of prep, you can whip up this showstopper that’s just perfect for family gatherings, parties, or even a cozy night in. Not only is it a crowd-pleaser, but it also lends itself to fun variations—think chocolate pudding or fresh fruit layers! What flavor combination will you choose to make this Cream Puff Cake your own?

Why is Cream Puff Cake a Must-Try?
Irresistible Taste: The stunning contrast of the light crust and rich filling will have you coming back for seconds.
Quick Prep: With just 20 minutes of prep time, you can create a fancy dessert that looks and tastes like it came from a bakery.
Versatile Options: Feel free to get creative—substituting chocolate pudding or layering in fresh fruit makes it easy to personalize this cake!
Perfect for Any Occasion: Whether it’s a holiday gathering or a weekend treat, this Cream Puff Cake fits right in, adding a touch of elegance to any table.
Effortless Crowd-Pleaser: Friends and family will be raving about your baking skills, similar to your success with these Oreo Ice Cream and Mermaid Ice Cream desserts!
Cream Puff Cake Ingredients
For the Pastry
• Water – Provides moisture needed for dough, creating the structure of the pastry.
• Salt – Enhances flavor and balances the sweetness.
• Butter – Adds richness and flavor; don’t skimp on quality here!
• All-Purpose Flour – Forms the dough’s base; it’s vital for achieving the right texture.
• Eggs – Create lift in the pastry, so beat them until thick and smooth for the best rise.
For the Cream Filling
• Instant Vanilla Pudding – Brings creaminess and sweetness; feel free to substitute with chocolate for a twist!
• Cream Cheese – Contributes a rich, smooth filling texture; ensure it’s softened for easy blending.
• Milk – Used to achieve the proper pudding consistency; any milk variant works fine.
For Topping
• Whipped Topping – Lightens the dessert, giving it a fluffy finish; you can also use homemade whipped cream.
• Chocolate Syrup – Adds a delightful drizzle for extra flavor; melted chocolate works great as an alternative.
There you have it—the perfect ingredients for your Cream Puff Cake! Get ready to impress your loved ones with this easy dessert.
Step‑by‑Step Instructions for Cream Puff Cake
Step 1: Preheat the Oven
Begin by preheating your oven to 450°F (230°C). While it’s heating, generously grease a 9×13-inch baking pan to prevent sticking. The oil or spray will ensure that your Cream Puff Cake rises perfectly, resulting in a golden-brown pastry crust that looks as delightful as it tastes.
Step 2: Boil the Mixture
In a medium saucepan, combine 1 cup of water, ½ cup of butter, and a pinch of salt. Bring this mixture to a rolling boil over medium heat. Once it’s bubbling, promptly remove the saucepan from heat. You’ll know it’s ready when the butter is fully melted and the water is steaming.
Step 3: Combine Flour and Dough Formation
Next, add 1 cup of all-purpose flour to the hot mixture all at once. Stir vigorously with a wooden spoon until the dough begins to pull away from the sides of the pan and forms a ball, about 2-3 minutes. This step is crucial as it builds the right structure for your Cream Puff Cake.
Step 4: Cool and Incorporate Eggs
Allow the dough to cool for about 10 minutes to prevent the eggs from scrambling. After cooling, add in 4 large eggs one at a time, beating well after each addition until the dough becomes smooth and shiny. This will help the pastry achieve its iconic airy texture as it bakes.
Step 5: Spread and Bake the Dough
Spread the dough evenly into the greased baking pan, making sure it reaches all corners. Bake the pastry in the preheated oven for 15 minutes. You’ll see it puffing up beautifully during this time, achieving a lovely golden color.
Step 6: Steam Release and Lower Temperature
Once your pastry has risen, take a sharp knife and prick it gently in several spots to let the steam escape. Then, carefully reduce the oven temperature to 350°F (175°C) and continue baking for an additional 20 minutes. You’ll know it’s done when the pastry is golden and crisp to the touch.
Step 7: Cool the Pastry
After baking, remove the Cream Puff Cake from the oven and let it cool in the pan for about 30 to 45 minutes. This cooling period is crucial for achieving that light, airy texture and ensuring that your cream filling won’t melt when added.
Step 8: Prepare the Cream Filling
While the pastry cools, prepare the filling by beating 8 ounces of softened cream cheese in a mixing bowl until smooth. Gradually whisk in one package of instant vanilla pudding and 2 cups of milk until well combined and creamy. This will create a rich and delightful filling for your cake.
Step 9: Assemble the Cake
Once the pastry has cooled, pour the cream filling over the top, spreading it evenly. Next, top it with 2 cups of whipped topping, creating a lovely fluffy layer. This not only adds texture but also rounds out the Cream Puff Cake’s rich flavors.
Step 10: Final Touch and Chill
For the finishing touch, drizzle your favorite chocolate syrup or melted chocolate over the top before refrigerating the assembled cake. Allow it to chill in the fridge for at least 1 hour before serving to set the layers beautifully. Your Cream Puff Cake is now ready to impress!
Make Ahead Options
These Cream Puff Cakes are perfect for meal prep enthusiasts! You can prepare the pastry up to 24 hours in advance by baking it and storing it covered at room temperature to prevent sogginess. For a quicker option, make the cream filling ahead and refrigerate it for up to 3 days in an airtight container to keep it fresh and creamy. When you’re ready to assemble, simply pour the filling over the cooled pastry, top with whipped cream, and drizzle with chocolate syrup. This way, you’ll have a show-stopping dessert ready to serve with minimal effort, perfect for those busy weeknights or last-minute gatherings!
How to Store and Freeze Cream Puff Cake
Fridge: Store any leftovers of your Cream Puff Cake covered with plastic wrap or in an airtight container for up to 2 days to maintain freshness.
Freezer: For longer storage, freeze the unassembled pastry and filling separately. The pastry can be frozen for up to 3 months, while the filling lasts about 1 month; thaw in the refrigerator before serving.
Assembling Tip: If you plan to freeze the cake, reassemble it only after thawing the pastry to ensure the filling retains its creamy goodness.
Reheating: If enjoyed warm, gently reheat the pastry in the oven at a low temperature, ensuring it remains flaky, while the filling can be enjoyed chilled or at room temperature.
Cream Puff Cake Variations & Substitutions
Feel free to unleash your creativity and customize this delightful Cream Puff Cake with these tasty twists!
-
Chocolate Pudding: Substitute the vanilla pudding with chocolate pudding for a rich and decadent variation. Chocolate lovers will rejoice with this twist!
-
Fruit Layers: Layer in fresh fruit like sliced strawberries or bananas between the pudding and whipped topping for a refreshing burst of flavor. It’s a delightful way to brighten each bite!
-
Almond Extract: Add a splash of almond extract to the cream filling for a nutty flavor that elevates this dessert to new heights. It harmonizes beautifully with the creamy texture.
-
Coconut Cream: Swap the cream cheese with coconut cream for a tropical twist. This variation offers a luscious, creamy texture with a hint of the islands!
-
Spicy Kick: For a bit of heat, sprinkle in some cinnamon or chili powder into the cream filling, creating a surprising and delightful contrast. Perfect for those adventurous taste buds!
-
Nut Garnish: Top with chopped nuts, like pistachios or almonds, to add a crunchy texture that pairs perfectly with the soft cream filling. It’s a fantastic textural contrast!
-
Mini Cream Puffs: Shape the dough into small balls for individual mini cream puffs. These bite-sized treats are perfect for gatherings and will leave your guests impressed!
Feel inspired to experiment with these ideas, and don’t forget to check out our delicious Pistachio Cream Chocolate or refreshing Oreo Ice Cream recipes for more delightful treats!
What to Serve with Cream Puff Cake?
Delight your senses and elevate your gathering with these perfect pairings for your dreamy dessert.
-
Fresh Berries: A medley of strawberries, raspberries, and blueberries adds a refreshing burst of flavor, balancing the sweetness of the Cream Puff Cake wonderfully. These vibrant fruits bring both color and a hint of tartness to your plate, making every bite feel fresh and exhilarating.
-
Coffee or Espresso: A warm cup of coffee or a shot of espresso cuts through the richness of the cake, enhancing its bold flavors. The aromatic notes create a comforting atmosphere, making for a cozy pairing that feels just right for any occasion.
-
Chocolate Ice Cream: Indulging in a scoop of velvety chocolate ice cream creates a decadent contrast with the lightness of the Cream Puff Cake. The chilled, creamy scoop adds a touch of luxury, making each bite a sweet celebration of flavors.
-
Whipped Cream Topping: On the side, a dollop of freshly whipped cream echoes the fluffy topping of the cake while adding extra lightness. It not only complements the textures but enhances the overall dessert experience with its airy sweetness.
-
Mint Tea: For a refreshing twist, serve a warm cup of mint tea alongside the dessert. The cool, herbal notes will cleanse your palate, inviting you back for another delightful bite of your Cream Puff Cake.
-
Caramel Drizzle: A drizzle of warm caramel sauce adds an irresistible richness to the Cream Puff Cake, layering flavors beautifully. This sweet addition transforms your dessert into a caramel-infused dream, perfect for those with a sweet tooth.
Expert Tips for Cream Puff Cake
-
Proper Cooling Time: Allow the dough to cool correctly before adding eggs; this ensures the right texture and prevents scrambled eggs from forming.
-
Watch the Oven: Keep an eye on the baking pastry; if the edges brown too quickly, cover them with foil to prevent burning while the center cooks.
-
Soften Cream Cheese: Make sure your cream cheese is very soft before mixing to avoid lumps in the creamy filling of your Cream Puff Cake.
-
Use All-Purpose Flour: Stick with all-purpose flour for the best structural integrity; using different flours may lead to a denser cake.
-
Layer with Fruits: Don’t hesitate to add slices of fresh fruit like strawberries or bananas for a refreshing twist; this elevates the flavors beautifully!

Cream Puff Cake Recipe FAQs
How do I select the best ingredients for my Cream Puff Cake?
Absolutely! For the best Cream Puff Cake, use fresh ingredients. When choosing your eggs, go for large, farm-fresh eggs for optimal lift in the pastry. Ensure your butter is of high quality, as it significantly impacts the flavor and texture of the dough. For flour, always stick with all-purpose flour to achieve the right structure, and check that your cream cheese is soft enough to blend smoothly without lumps.
What’s the best way to store leftover Cream Puff Cake?
Very! Store any leftovers covered tightly with plastic wrap or in an airtight container in the refrigerator for up to 2 days. This will help preserve the freshness of your light pastry and creamy filling. If you have leftover whipped topping, it can be stored separately for the best texture when you serve again.
Can I freeze Cream Puff Cake for later?
Certainly! For freezing, I recommend separating the pastry and the filling. Wrap the cooled pastry tightly in plastic wrap or aluminum foil, then place it in a freezer-safe bag. It will keep for up to 3 months. The filling can be stored in an airtight container in your freezer for about 1 month. When you’re ready to enjoy it, thaw both items in the fridge overnight, and then assemble just before serving.
What if my Cream Puff Cake doesn’t rise properly?
Oh no! If your Cream Puff Cake doesn’t rise as expected, it could be due to a couple of factors. Ensure that the dough is mixed well after adding the flour, as creating a proper dough ball is essential. If your oven temperature was too low, that could also impact the rise; use an oven thermometer to check accuracy. Remember to prick the pastry correctly after the initial bake—this allows steam to escape and helps maintain its puffiness.
Are there any dietary considerations I should keep in mind?
Very much so! If you’re serving guests with dietary restrictions, you can easily adapt the Cream Puff Cake recipe. For a gluten-free version, substitute all-purpose flour with a gluten-free flour blend. If someone has lactose intolerance, consider using dairy-free alternatives for butter and cream cheese. Also, always check for any allergens in your whipping cream and pudding mix if you have guests with specific food allergies.
Cream Puff Cake: Your New Favorite Homemade Dessert Delight
Ingredients
Equipment
Method
- Preheat your oven to 450°F (230°C) and grease a 9x13-inch baking pan.
- Combine 1 cup of water, ½ cup of butter, and a pinch of salt in a medium saucepan and bring it to a boil.
- Add 1 cup of all-purpose flour to the hot mixture and stir vigorously until a ball forms.
- Let the dough cool for about 10 minutes before adding in 4 large eggs one at a time.
- Spread the dough evenly into the greased baking pan and bake for 15 minutes.
- Prick the pastry with a knife to let the steam escape, then reduce the oven temperature to 350°F (175°C) and bake for an additional 20 minutes.
- Remove the pastry from the oven and let it cool in the pan for about 30-45 minutes.
- Beat 8 ounces of softened cream cheese until smooth, then whisk in one package of instant vanilla pudding and 2 cups of milk.
- Pour the cream filling over the cooled pastry and top with 2 cups of whipped topping.
- Drizzle with chocolate syrup and refrigerate for at least 1 hour before serving.
Leave a Reply