
As I flipped through old recipe books last Halloween, I stumbled upon a treasure that immediately sparked joy: Fun Halloween Witch Hat Cookies. These delightful treats are more than just fun to look at; they’re a canvas for creativity and a crowd-pleaser at any gathering. With their easy preparation and customizable options, they easily fit into festive celebrations – making them a perfect project for both kids and adults. Plus, these whimsical cookies come together quickly, allowing you to conjure up tasty memories without the stress. Want to join me in creating these charming confections that are sure to be the highlight of your Halloween festivities? Let’s dive into the magic of cookie-making!
Why Are These Cookies So Fun?
Whimsical, Eye-Catching Design: Kids and adults alike will adore these visually stunning witch hat cookies that are sure to steal the spotlight at any Halloween gathering.
Customizable Flavors: Switch out the chocolate cake mix for pumpkin spice or vanilla to create unique twists that suit any taste preference.
Easy and Fun to Make: Perfect for family bonding, these cookies come together quickly, making them a stress-free treat to whip up before parties.
Creative Decoration: Encourage your inner artist with a rainbow of icing colors to personalize each witch hat cookie, just like a gourmet version of Chewy Oreo Cookies.
Kid-Friendly Activity: Engaging children in the decorating process sparks joy and creates lasting memories, transforming your kitchen into a fun-filled workshop!
Experience the magic of home-baked goodies with these delightful cookies that will have everyone begging for a bite!
Fun Halloween Witch Hat Cookie Ingredients
• Get ready to create some spooky delights! Here are the essential ingredients for your Fun Halloween Witch Hat Cookies.
For the Cookie Base
- Favorite Cake Mix – Provides a sweet and easy preparation; feel free to use a homemade chocolate cake recipe for a personal touch.
- Store Bought Chocolate Cookies – A simplified yet delicious cookie base that makes it easy to savor the chocolatey goodness; homemade versions can add an elevated touch.
For the Hat Structure
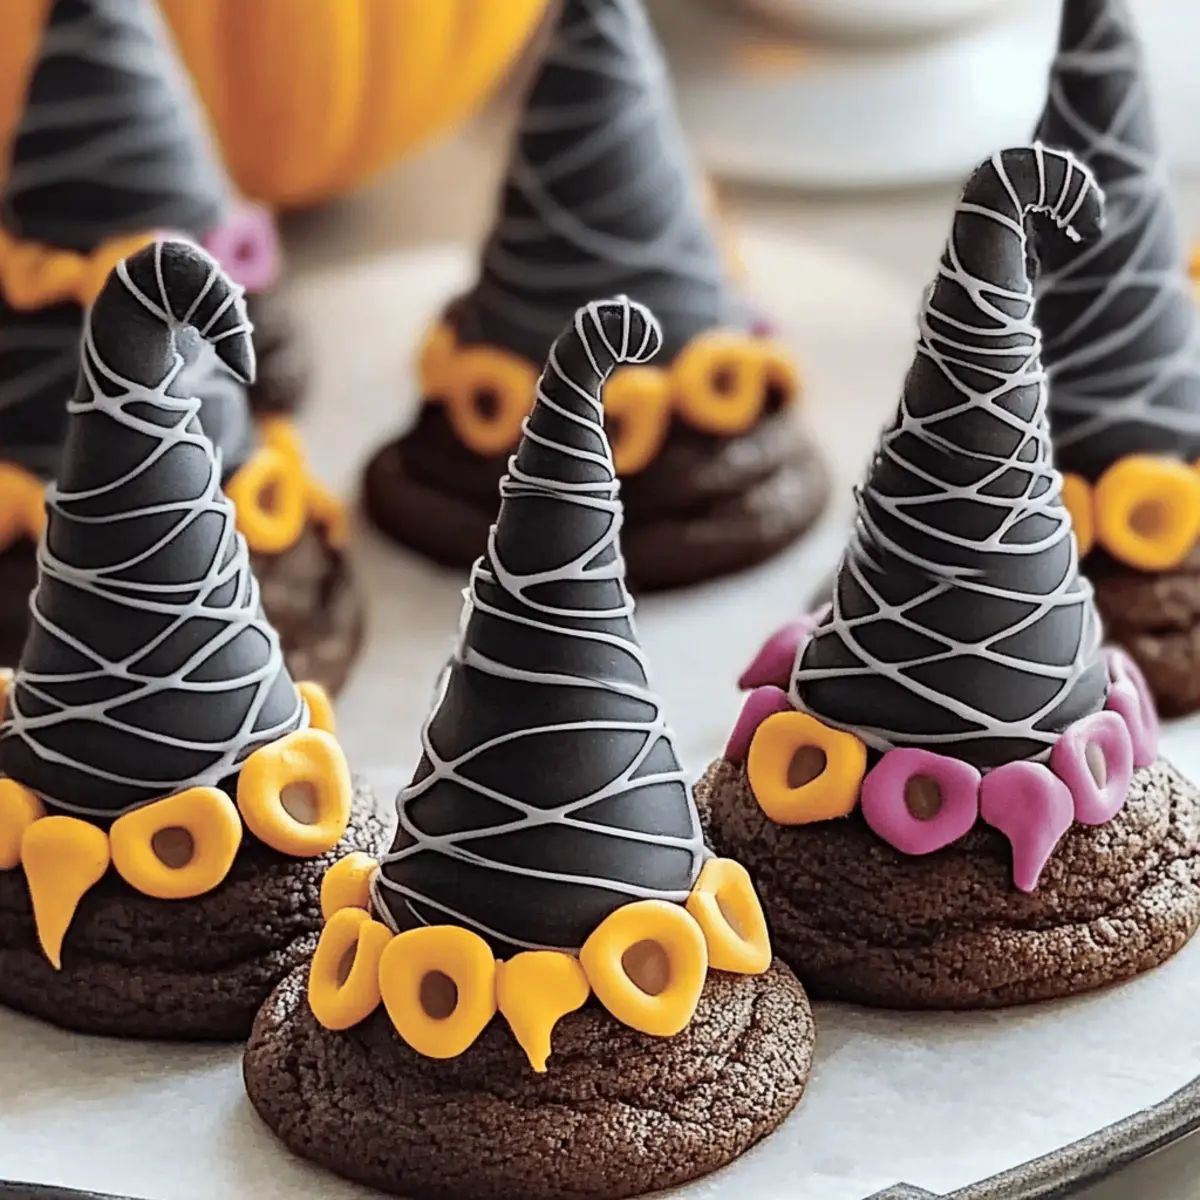
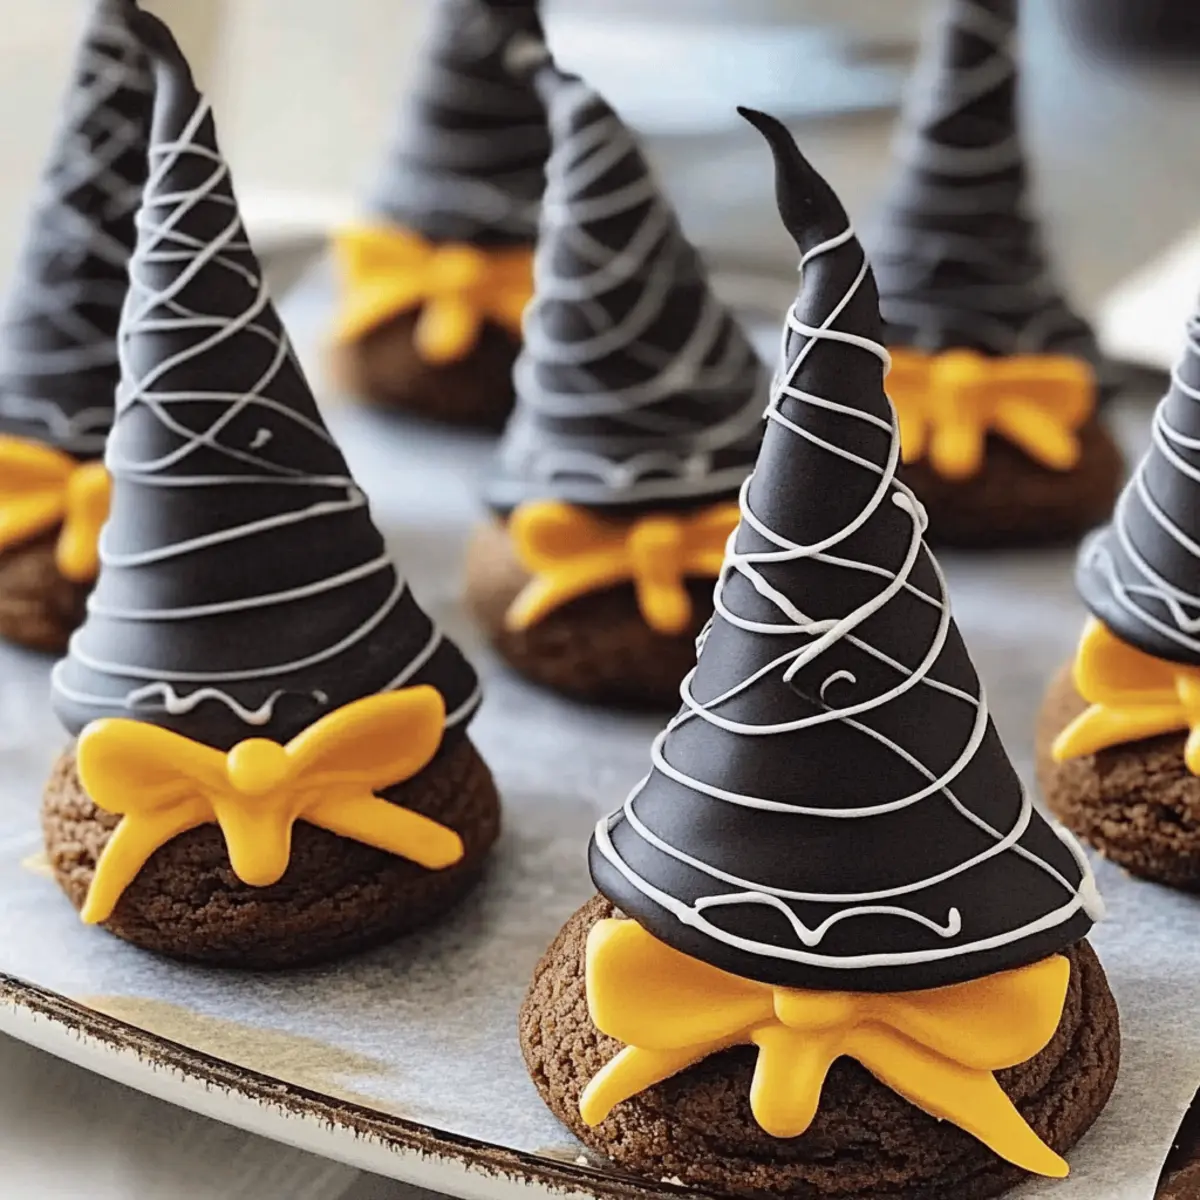
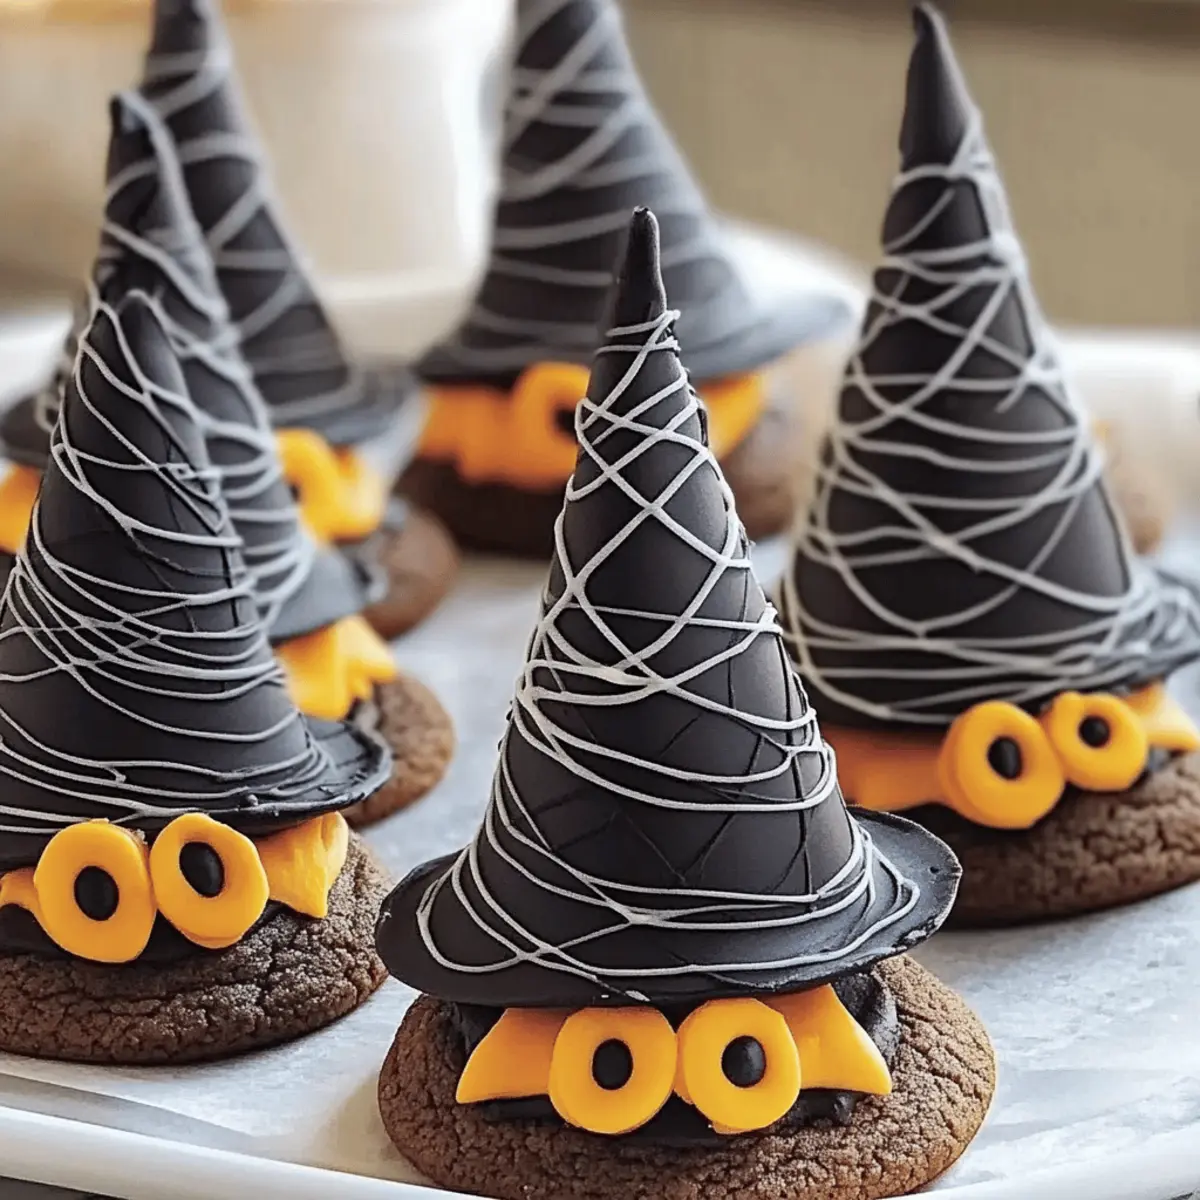
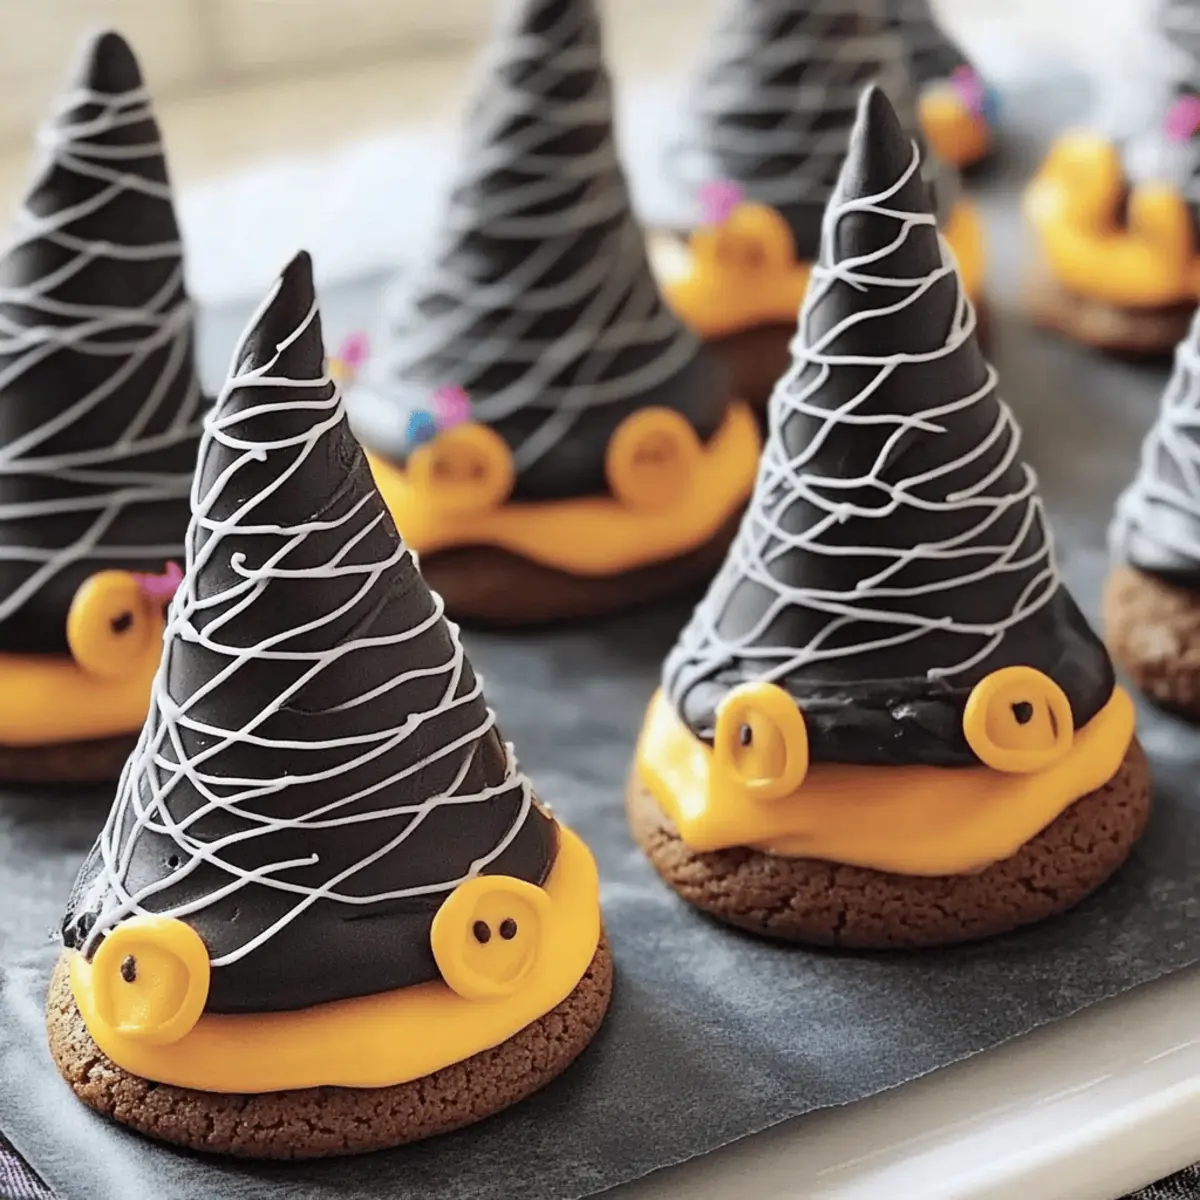
- Sugar Cones – These are essential for creating the iconic witch hat shape that holds everything together, so no substitutes here!
For Decorating
- Black Color Mist Food Coloring Spray – This spray gives the cones their spooky hue; black icing can serve as an alternative for a similar effect.
- Creamy White Decorator Icing – Acts as the primary icing for your cookie designs; you can substitute royal icing if a firmer finish is desired.
- Lemon Yellow Icing Color – Adds brightness and vibrancy to your decorations; natural dyes work well if you prefer a non-artificial option.
- Rose, Violet, Golden Yellow, & Orange Icing Colors – These vibrant hues create a colorful, festive appearance; you can mix and match with other food colorings to suit your Halloween theme.
Now that you have your ingredients lined up, let’s start the spooky baking adventure!
Step‑by‑Step Instructions for Fun Halloween Witch Hat Cookies
Step 1: Prepare the Cookie Base
Start by preheating your oven to 350°F (175°C). In a mixing bowl, prepare your favorite cake mix according to the package instructions. Fill each sugar cone with about 2 tablespoons of the batter and place them upright on a baking sheet lined with parchment paper. Bake for 15-18 minutes or until a toothpick inserted into the cake comes out clean. Allow the cones to cool completely before moving on.
Step 2: Color the Cones
Once the cones are cooled, carefully trim any excess cake from the tops to achieve a neat and clean edge. With your black color mist food coloring spray, coat each cone thoroughly to create the iconic witch hat look. Hold the cone at a distance while spraying to ensure an even coat, and then let them dry completely, as this is crucial for clean assembly.
Step 3: Tint the Icing
While waiting for the cones to dry, take your creamy white decorator icing and scoop it into small bowls. Color one bowl with lemon yellow icing color and another with either rose or violet, depending on your desired look for the hats. Prepare piping bags for each color, making sure to cut a small opening in the tip for easy decorating. This vibrant icing will bring your Fun Halloween Witch Hat Cookies to life!
Step 4: Assemble the Hats
Now it’s time to put your witch hats together! Pipe a generous layer of orange icing on the tops of your chocolate cookies to act as glue. Gently place the colored sugar cones on top of the cookies, ensuring they stick well. Secure them by piping additional orange or purple icing around the base of the cones to complete the hat look. This step truly brings your Fun Halloween Witch Hat Cookies to their whimsical glory.
Step 5: Finish with Decorative Details
Once the icing has set, it’s time to get creative! Pipe a decorative yellow buckle around the base of each cone using the yellow icing pouch, adding a fun touch to your witch hats. Allow the icing to dry completely on the decorated cookies before serving or storing them. Your Fun Halloween Witch Hat Cookies are now ready to delight all who see and taste them!
Helpful Tricks for Fun Halloween Witch Hat Cookies
-
Drying Time Matters: Allow the black spray to dry completely before assembling your cookies to avoid any color smudging that could ruin your witch hats.
-
Icing Consistency: Use a medium consistency for your icing to ensure it adheres well to the cookie and cone, preventing any sliding during assembly.
-
Immediate Decoration: Decorate your cones right after spraying them, as this ensures that the icing sticks properly and doesn’t slide off.
-
Gentle Handling: Handle your finished cookies with care to maintain their delightful appearance; place them in single layers when storing to avoid squashing the designs.
-
Get Creative: Have fun customizing your Fun Halloween Witch Hat Cookies with various icing colors or adding candy accessories to enhance their festivity!
Fun Halloween Witch Hat Cookies Variations
Feel free to play with the flavors and designs of these enchanting cookies to suit your festive mood!
-
Pumpkin Spice: Swap chocolate cake mix for pumpkin spice for a cozy, seasonal twist. It’s like bringing the flavors of fall right into your treats!
-
Crunchy Texture: Mix in crushed pretzels or toffee bits into the cake batter to create a delightful contrast with the soft cookie base. Every bite will surprise with flavor!
-
Colorful Icing: Use different food coloring hues to align icing with various Halloween themes, or let the kids choose their favorite colors for a personal touch. It’s all about fun and creativity!
-
Mini Versions: Create bite-sized cookies by using smaller cones for a fun treat that’s perfect for parties or easy handouts. They’re just as adorable and delicious in mini form!
-
Gummy Accessories: Top each witch hat with gummy worms or spooky candies for a playful twist that will delight little ghouls and goblins. The extra décor makes the cookies even more festive!
-
Vegan Alternative: Substitute eggs with flaxseed meal and use a plant-based cake mix to create a vegan version of these delightful cookies. Everyone can join the spooky fun!
-
Chocolate Drizzle: Finish with a drizzle of melted chocolate over the top for added decadence and visual appeal. Your guests won’t be able to resist the extra touch of chocolatey goodness!
Add a sprinkle of creativity, and your Fun Halloween Witch Hat Cookies will be a hit that brings smiles all around, reminiscent of the delicious adventure of making Chewy Oreo Cookies or colorful creations like White Chocolate Halloween. The joy of baking is yours to explore!
Make Ahead Options
These Fun Halloween Witch Hat Cookies are fantastic for meal prep, allowing you to save time when creating festive treats! You can prepare the cookie bases (the sugar cones filled with cake batter) up to 24 hours in advance; just bake, cool, and store them in an airtight container at room temperature. The icing can be tinted and placed in piping bags up to 3 days prior; refrigerate the bags to maintain the vibrant colors. When it’s time to serve, simply assemble the cones on top of the cookies with the icing, completing the decorations right before your guests arrive for fresh, whimsical treats that taste just as delicious as when first made!
What to Serve with Fun Halloween Witch Hat Cookies
These delightful treats are sure to be a hit, so let’s create a festive feast to accompany them!
-
Chili Con Carne: This hearty dish offers a savory contrast to the sweetness of the cookies, making it a perfect pairing for a Halloween gathering.
-
Glowing Green Punch: A fun, fizzy drink with a touch of lime flavor captures the Halloween spirit while refreshing your guests at the party.
-
Ghostly Deviled Eggs: These creamy bites can be decorated with spooky faces, adding a playful touch to the table that complements your whimsical cookies.
-
Roasted Pumpkin Seeds: Crunchy and slightly salty, these make for a great snack that balances the sweetness of the Fun Halloween Witch Hat Cookies.
-
Mummy Hot Dogs: Wrapped in crescent roll dough, these cute savory treats are a simple yet festive addition to your Halloween spread!
-
Caramel Apple Slices: For a refreshing combination, serve crisp apple slices drizzled with caramel to contrast with the rich sweetness of your cookies.
-
Fangtastic Fruit Salad: Combine seasonal fruits like oranges and pears; add in some ghost-shaped marshmallows to keep the theme fun and lively.
-
Spooky Cheese Platter: Arrange a variety of cheeses with fun Halloween-themed crackers, providing a savory option that balances the sugary delights.
With these pairings, your Halloween celebration will be both spooky and scrumptious, leaving everyone enchanted!
How to Store and Freeze Fun Halloween Witch Hat Cookies
Room Temperature: Store cookies in an airtight container at room temperature for up to 5 days, keeping them fresh and delicious for your spooky celebrations.
Freezer: For longer storage, freeze your assembled cookies in a single layer. They can last up to 3 months, but be sure to wrap them tightly to prevent freezer burn.
Reheating: If you’d like to enjoy them warm, let the cookies thaw in the fridge overnight and reheat in the oven for a few minutes at 300°F (150°C) to refresh the texture.
Handling Tips: When storing, be gentle to avoid squishing the icing; layering with parchment paper can help keep your Fun Halloween Witch Hat Cookies looking their best.
Fun Halloween Witch Hat Cookies Recipe FAQs
How do I choose the right cake mix for my cookies?
Absolutely! For the Fun Halloween Witch Hat Cookies, I recommend using a chocolate cake mix for its rich flavor. However, if you’re looking for a seasonal twist, swapping it for a pumpkin spice or vanilla mix can add a delightful touch. Make sure to check the ingredients for added sweetness or flavor enhancements!
What is the best way to store leftover cookies?
To keep your Fun Halloween Witch Hat Cookies fresh, store them in an airtight container at room temperature for up to 5 days. It’s essential to ensure that they’re completely cool before placing them in the container to avoid moisture buildup that can make them soggy.
Can I freeze the witch hat cookies for later use?
Very! You can absolutely freeze your assembled Fun Halloween Witch Hat Cookies. Place them in a single layer on a baking sheet and freeze until solid. Once frozen, transfer them to an airtight container or freezer bag, ensuring to wrap them tightly to prevent freezer burn. They will stay fresh for up to 3 months. When you’re ready to enjoy, simply thaw them in the fridge overnight!
What should I do if the icing is too runny or too thick?
If your icing is too runny, try adding a bit more powdered sugar until you reach the desired consistency. Conversely, if it’s too thick, you can thin it out by adding a teaspoon of milk or water at a time until it flows more smoothly. Always mix thoroughly after each addition to ensure a perfect decorating texture!
Are these cookies suitable for kids with allergies?
When making Fun Halloween Witch Hat Cookies, it’s crucial to consider any allergies. The cake mix and icing might contain allergens like gluten, dairy, or eggs, depending on the brands you choose. Always read labels carefully and consider using gluten-free cake mixes or egg substitutes for sensitive eaters. For pet safety, keep these cookies out of reach as they may contain ingredients harmful to pets, like chocolate.
Delightful Fun Halloween Witch Hat Cookies for Spooky Fun
Ingredients
Equipment
Method
- Preheat oven to 350°F (175°C). Prepare cake mix according to package instructions. Fill each sugar cone with batter and place upright on a lined baking sheet. Bake for 15-18 minutes.
- Once cooled, trim excess cake from tops. Spray with black color mist food coloring and let dry completely.
- Scoop creamy white icing into bowls. Tint with lemon yellow, rose, or violet as desired, and prepare piping bags.
- Pipe orange icing on tops of chocolate cookies. Place colored sugar cones on top, securing with more icing around the base.
- Pipe decorative yellow buckle around each cone base with yellow icing. Allow to dry before serving or storing.
Leave a Reply