
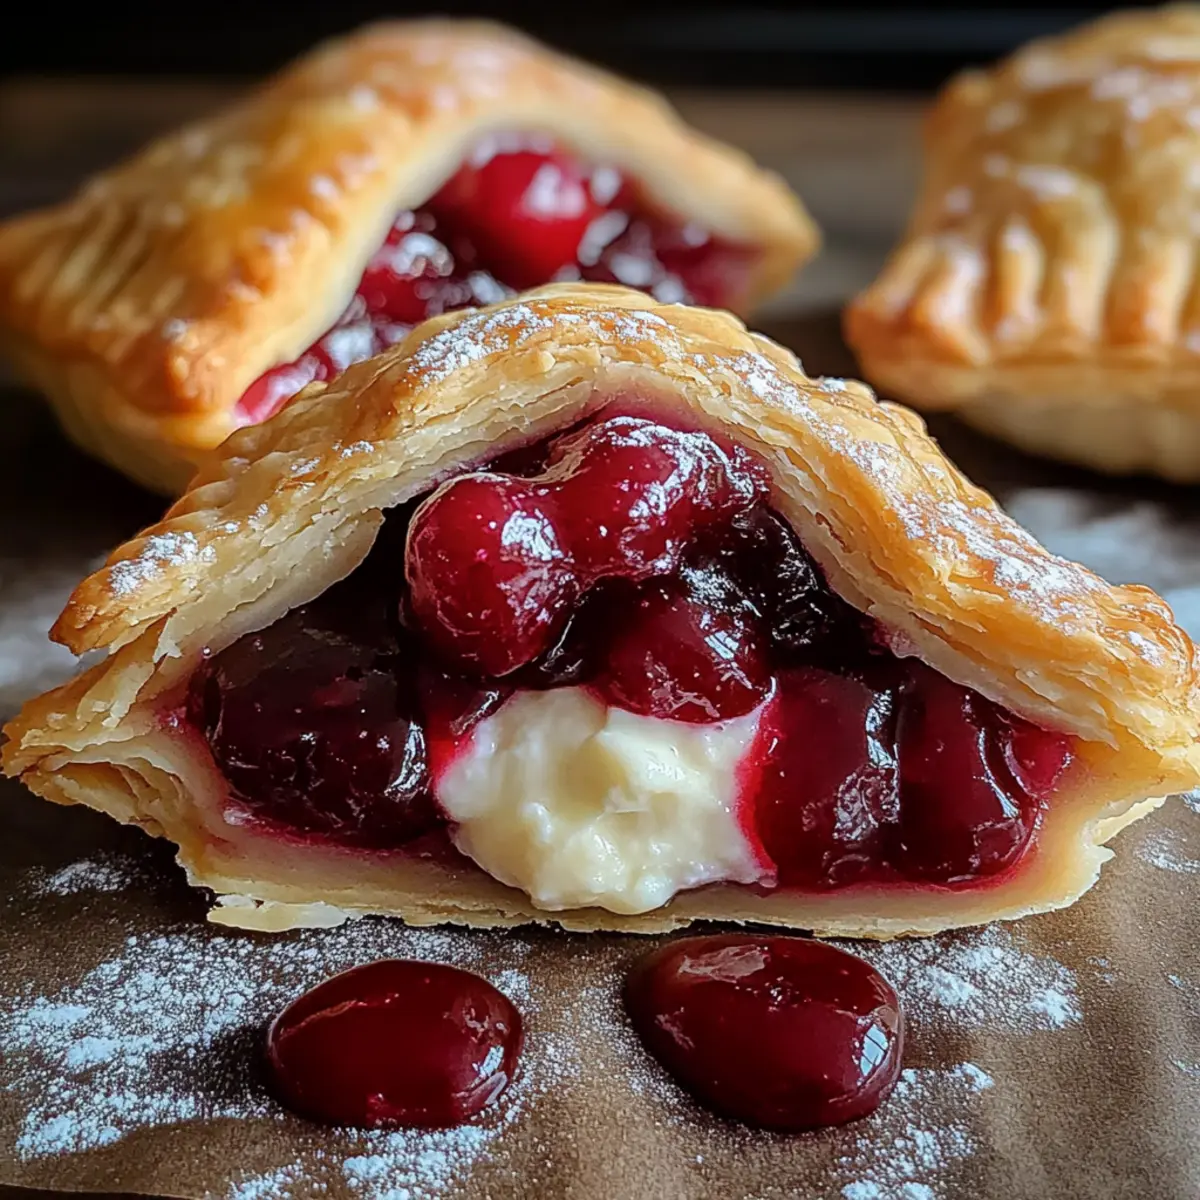
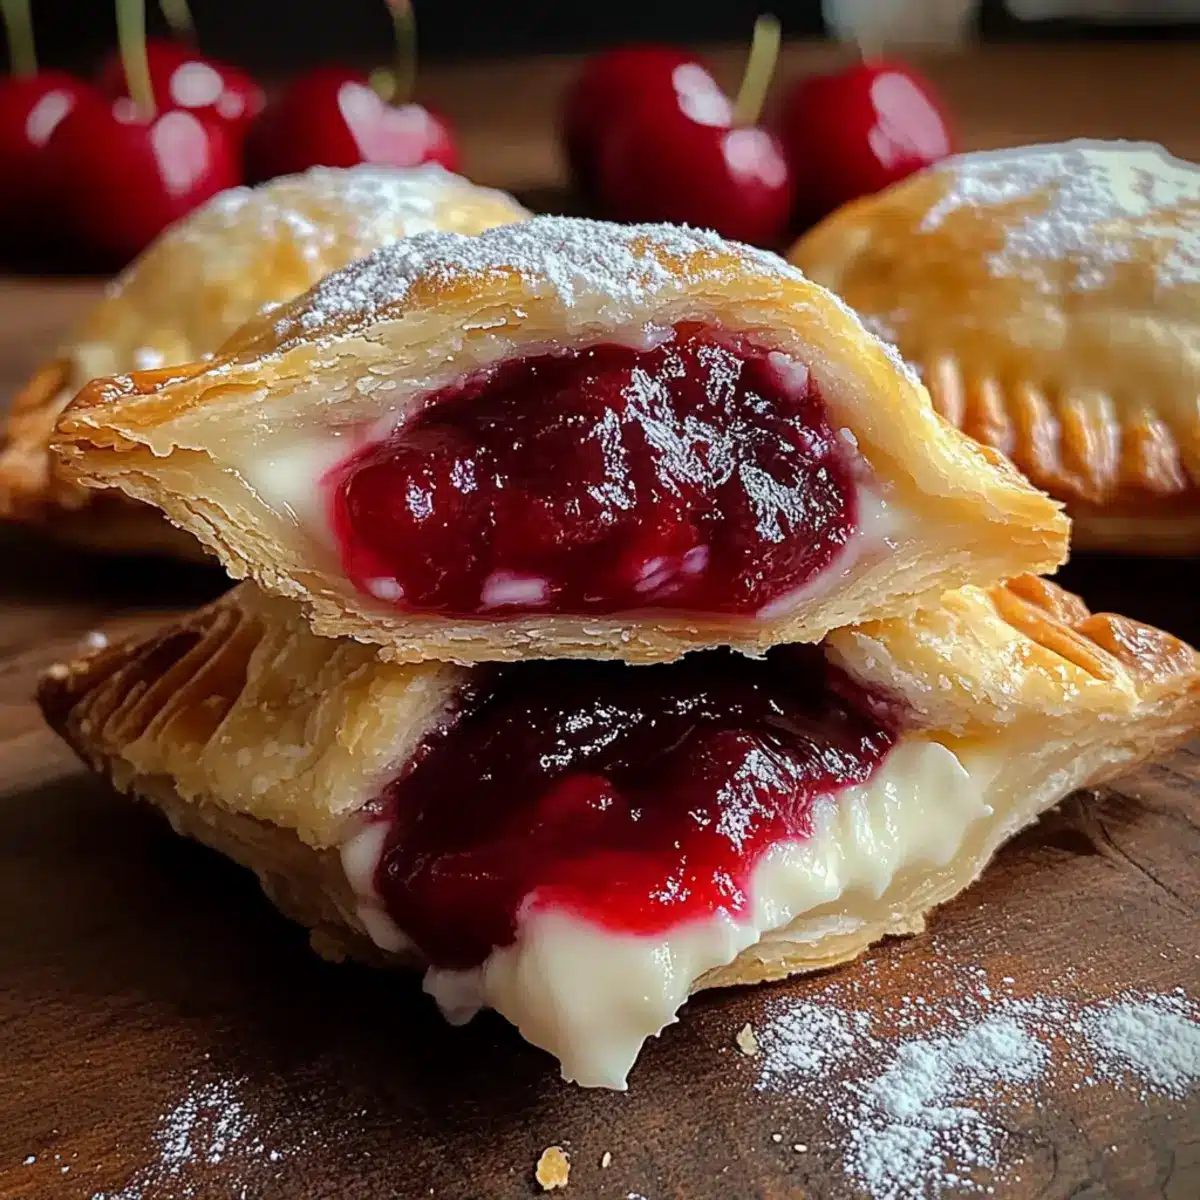
As I rummaged through my fridge one afternoon, the glimmer of leftover cream cheese caught my eye—a sure sign it was time for something delightful. Enter the Cherry Cheesecake Hand Pies! This recipe is a lifesaver, transforming ordinary ingredients into crispy, creamy delights that will bring a smile to anyone’s face. Not only are they quick to whip up, making them perfect for busy days, but they’re also an incredible crowd-pleaser, ideal for gatherings or cozy nights in. Each bite feels like a warm hug, wrapping that sweet cherry goodness and rich cheesecake filling in a perfect, flaky crust. Are you ready to treat yourself and your loved ones to a bite of magic? Let’s dive in!
Why Are These Hand Pies Amazing?
Versatile Delight: You can easily swap out cherry filling for other flavors, like blueberry or apple, making these hand pies adaptable to any taste or season.
Quick and Easy: The straightforward process allows even novice cooks to create impressive treats without the fuss, delivering delightful results in under an hour.
Crispy Perfection: Fried to a golden brown, the flaky crust envelopes the creamy filling, creating a satisfying crunch that balances beautifully with the smooth cheesecake.
Crowd-Pleasing Treat: Whether served at parties or enjoyed as a cozy evening snack, these Cherry Cheesecake Hand Pies are sure to impress family and friends. For more sweet delights, check out my delicious Oreo Cheesecake Cookie or indulge in Blueberry Crumble Cheesecake for a twist!
Make-Ahead Magic: Prepare these hand pies in advance, refrigerating before frying; they save time and deliver fresh-tasting desserts whenever you need them!
Cherry Cheesecake Hand Pies Ingredients
• Perfect for a delightful treat!
For the Filling
- Cream Cheese – Provides richness and creaminess to the filling; ensure it’s softened for easy mixing.
- Granulated Sugar – Adds delightful sweetness to the cream cheese filling, making it utterly delectable.
- Cherry Pie Filling – Offers a burst of fruity flavor that beautifully complements the cheesecake; feel free to substitute with any fruit filling you desire.
For the Crust
- Refrigerated Pie Crust – Forms the crispy outer layer that cradles the filling; homemade dough can elevate the freshness of your hand pies.
For Frying
- Vegetable Oil – Essential for frying, it should be heated to 190°C for that golden, crispy texture.
For Glaze
- Powdered Sugar – Sweetens and adds shine to your hand pies; mix with corn syrup and water for a perfect glaze.
- Corn Syrup – Gives the glaze a rich texture; essential for that sweet finish.
- Water – Helps achieve the desired consistency of the glaze.
Step‑by‑Step Instructions for Cherry Cheesecake Hand Pies
Step 1: Prepare Oil
In a deep pot, heat vegetable oil to 190°C (375°F). This temperature is crucial for achieving that perfect crispy exterior on your Cherry Cheesecake Hand Pies. Use a cooking thermometer to ensure accuracy, and give the oil a moment to come to temperature while you prepare the filling.
Step 2: Make Filling
In a mixing bowl, beat together softened cream cheese and granulated sugar until the mixture is creamy and smooth. This step is important for creating a luscious filling that complements the cherry flavor. Taste the mixture and adjust the sweetness if desired, then set it aside while you cut the dough.
Step 3: Cut Dough
Roll out your refrigerated pie crust on a lightly floured surface. Using a round cutter, cut out six circles measuring 13–15 cm in diameter. The dough should feel cool to the touch but pliable enough to handle. This will be the crispy shell holding your delicious filling, so ensure they are evenly shaped.
Step 4: Assemble Hand Pies
On each dough circle, place a tablespoon of the cream cheese filling followed by about 30 g of cherry pie filling. To seal these delightful hand pies, brush a little water along the edges of the dough, fold them in half, and crimp the edges securely with a fork for a decorative touch that holds them together.
Step 5: Fry Pies
Carefully lower each assembled hand pie into the hot oil, one at a time, ensuring you don’t overcrowd the pot. Fry for 2-3 minutes, or until they turn a gorgeous golden brown. Use a slotted utensil to help with the frying process and to give you safe handling of these crispy Cherry Cheesecake Hand Pies as they cook.
Step 6: Glaze
Once fried, remove the hand pies from the oil and let them rest on paper towels to drain excess oil. While they are still warm, whisk together powdered sugar, corn syrup, and a splash of water to create a smooth glaze. Brush this glaze over the hand pies for an extra touch of sweetness and shine that will elevate your treats!

Expert Tips for Cherry Cheesecake Hand Pies
-
Temperature Matters: Maintain the oil temperature at 190°C to ensure your Cherry Cheesecake Hand Pies turn out crispy, not soggy. Use a thermometer for accuracy.
-
Avoid Overfilling: Be careful not to overstuff the hand pies. Too much filling can cause them to burst during frying, leading to a mess and an incomplete treat.
-
Resting Time: After frying, let the hand pies rest on paper towels for a few minutes. This helps drain excess oil and keeps them crispy, enhancing the overall texture.
-
Baking Option: If you prefer a lighter treat, you can bake these hand pies instead. Preheat your oven to 375°F, brush with egg wash, and bake for 15-20 minutes until golden.
-
Customize Your Glaze: Feel free to experiment with your glaze! Adding a splash of almond extract or lemon juice can enhance the sweetness and flavor profile of your Cherry Cheesecake Hand Pies.
Cherry Cheesecake Hand Pies Variations
Feel free to make these Cherry Cheesecake Hand Pies your own by exploring these delightful twists and swaps!
-
Fruit Fillings: Experiment with different fruit fillings, such as blueberry or apple, for a seasonal twist that brightens every bite.
-
Chocolate Lovers: Swap out the cherry filling for a rich chocolate spread, creating a truly indulgent treat that’s sure to satisfy any sweet tooth!
-
Baked Version: For a lighter alternative, bake instead of fry; just brush the assembled pies with an egg wash and pop them in the oven at 375°F for a healthier option.
-
Glazed Perfection: Enhance the glaze by adding a splash of vanilla extract or almond extract for an extra layer of flavor that complements the creamy filling beautifully.
-
Mini Hand Pies: For a fun bite-sized version, cut the dough circles smaller and adjust the filling accordingly—perfect for parties or casual snacking!
-
Nutty Touch: Add chopped nuts, like walnuts or pecans, to the filling for a delightful crunch that pairs wonderfully with the smooth cheesecake flavor.
-
Spicy Kick: For a little heat, sprinkle some cinnamon or even a pinch of cayenne into the cream cheese filling to elevate the flavor profile.
-
Savory Spin: Can you believe it? Transform them into savory delights by using cream cheese mixed with herbs and your favorite cooked vegetables—perfect as an appetizer!
Whether you’re drawn to the charm of traditional flavors or want to branch out with daring combinations, these variations open a door to endless possibilities. And if you’re looking for more desserts, why not try my scrumptious Oreo Cheesecake Cookie for an extra layer of delight?
What to Serve with Cherry Cheesecake Hand Pies
There’s nothing like a cozy meal paired with sweet delights to round off your day; these hand pies are just the beginning!
-
Vanilla Ice Cream: The creamy, rich coldness of vanilla ice cream perfectly contrasts the warm, crispy hand pies, creating a delightful dessert experience.
-
Whipped Cream: Light and airy, this topping adds an element of elegance and enhances the creamy filling, making each bite even more indulgent.
-
Fresh Berries: A mix of strawberries, blueberries, and raspberries introduces freshness and tartness that balances the sweetness of the hand pies beautifully.
-
Dark Chocolate Drizzle: Drizzling melted dark chocolate over the pies elevates their sophistication, adding a rich, decadent layer that chocolate lovers will adore.
-
Mint Tea: A fragrant cup of mint tea provides a refreshing palate cleanser that complements the sweet and tangy flavors of the hand pies, enhancing your meal experience.
-
Lemonade: The crisp, tangy notes of chilled lemonade offer a zesty counterpoint to the sweetness of the hand pies, making for a refreshing combo on warm days.
-
Chocolate Milkshake: Indulge in a thick chocolate milkshake for a nostalgic, comforting pairing that’s sure to delight kids and adults alike during sweet gatherings!
-
Coconut Whipped Cream: This vegan option is light and fluffy, adding a tropical twist that creates a dreamy match with the creaminess of the cheesecake filling.
Make Ahead Options
These Cherry Cheesecake Hand Pies are perfect for busy cooks looking to save time without sacrificing flavor! You can prepare and refrigerate the assembled hand pies up to 24 hours in advance. To do this, simply follow the recipe’s steps up to the frying point, then place the pies on a baking sheet lined with parchment paper and cover tightly with plastic wrap before refrigerating. This method helps maintain their quality while preventing the crust from becoming soggy. When you’re ready to enjoy, just fry them directly from the fridge; there’s no need to wait for them to come to room temperature. You’ll have delightful, warm hand pies ready to serve in no time!
How to Store and Freeze Cherry Cheesecake Hand Pies
Room Temperature: Let the hand pies cool completely before storing them in an airtight container at room temperature for up to 2 days. This keeps them fresh while maintaining their crispy texture.
Fridge: For extended freshness, refrigerate leftover Cherry Cheesecake Hand Pies in an airtight container for up to 3 days. Reheat in the oven for crispiness before serving.
Freezer: To freeze, place un-fried assembled hand pies in a single layer on a baking sheet until solid, then transfer them to a freezer-safe bag or container. They can be frozen for up to 3 months.
Reheating: When ready to enjoy frozen hand pies, fry them directly from the freezer for about 3–4 minutes, or bake them at 375°F for 20–25 minutes until golden brown and heated through.
Cherry Cheesecake Hand Pies Recipe FAQs
What type of cherries should I use in the filling?
Absolutely! Look for quality cherry pie filling that’s not too watery, as this keeps the hand pies from becoming soggy. If using fresh cherries, ensure they’re ripe, firm, and free of dark spots, then pit and slice them before mixing with a bit of sugar for sweetness.
How should I store any leftover Cherry Cheesecake Hand Pies?
Very! Let the hand pies cool completely before placing them in an airtight container at room temperature for up to 2 days. To maintain their crispiness, consider reheating them in the oven before serving, as this rejuvenates the crust beautifully.
Can Cherry Cheesecake Hand Pies be frozen?
Yes, they can! To freeze, place un-fried, assembled hand pies on a baking sheet in a single layer until solid. Then, transfer them to a freezer-safe bag or container for up to 3 months. When you’re ready to enjoy them, fry them straight from the freezer or bake at 375°F for 20-25 minutes until golden.
What should I do if my hand pies burst during frying?
Don’t worry! If you find that your hand pies are bursting, it often means they were overfilled. Ensure you’re using just a tablespoon of filling and crimping the edges well. If bursts do occur, simply let them drain on paper towels and enjoy them as they are—still delicious!
Can I make these hand pies ahead of time?
Absolutely! Prepare the filling and assemble the hand pies in advance. You can refrigerate them for up to one day before frying, making it a breeze to enjoy fresh desserts when time is tight!
Are Cherry Cheesecake Hand Pies safe for pets?
Very! Since these hand pies contain sugar and dairy, it’s best to keep them away from pets, especially dogs or cats. Foods like cream cheese can upset their digestive systems, so it’s safer just to share the love with friends and family instead!

Cherry Cheesecake Hand Pies That Warm Your Heart
Ingredients
Equipment
Method
- In a deep pot, heat vegetable oil to 190°C (375°F).
- In a mixing bowl, beat together softened cream cheese and granulated sugar until creamy and smooth. Set aside.
- Roll out your refrigerated pie crust on a lightly floured surface and cut out six circles, 13–15 cm in diameter.
- On each dough circle, place a tablespoon of cream cheese filling followed by about 30 g of cherry pie filling. Seal with water and crimp the edges.
- Fry each assembled hand pie for 2-3 minutes, or until golden brown. Use slotted utensil for safe handling.
- Whisk powdered sugar, corn syrup, and water to create a glaze. Brush over the warm hand pies.
Leave a Reply