
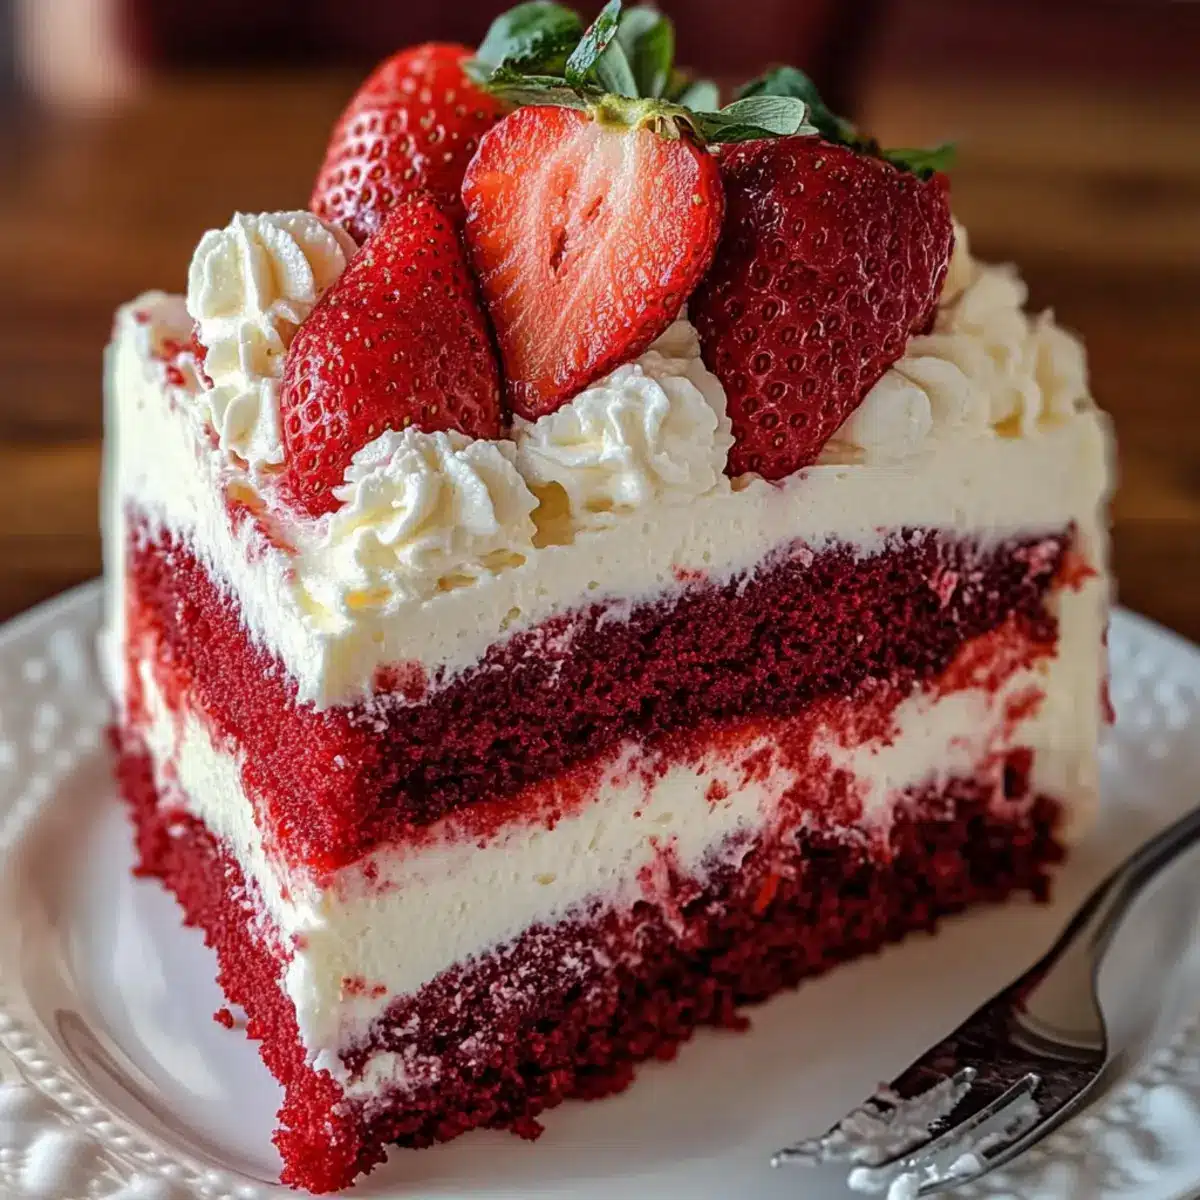
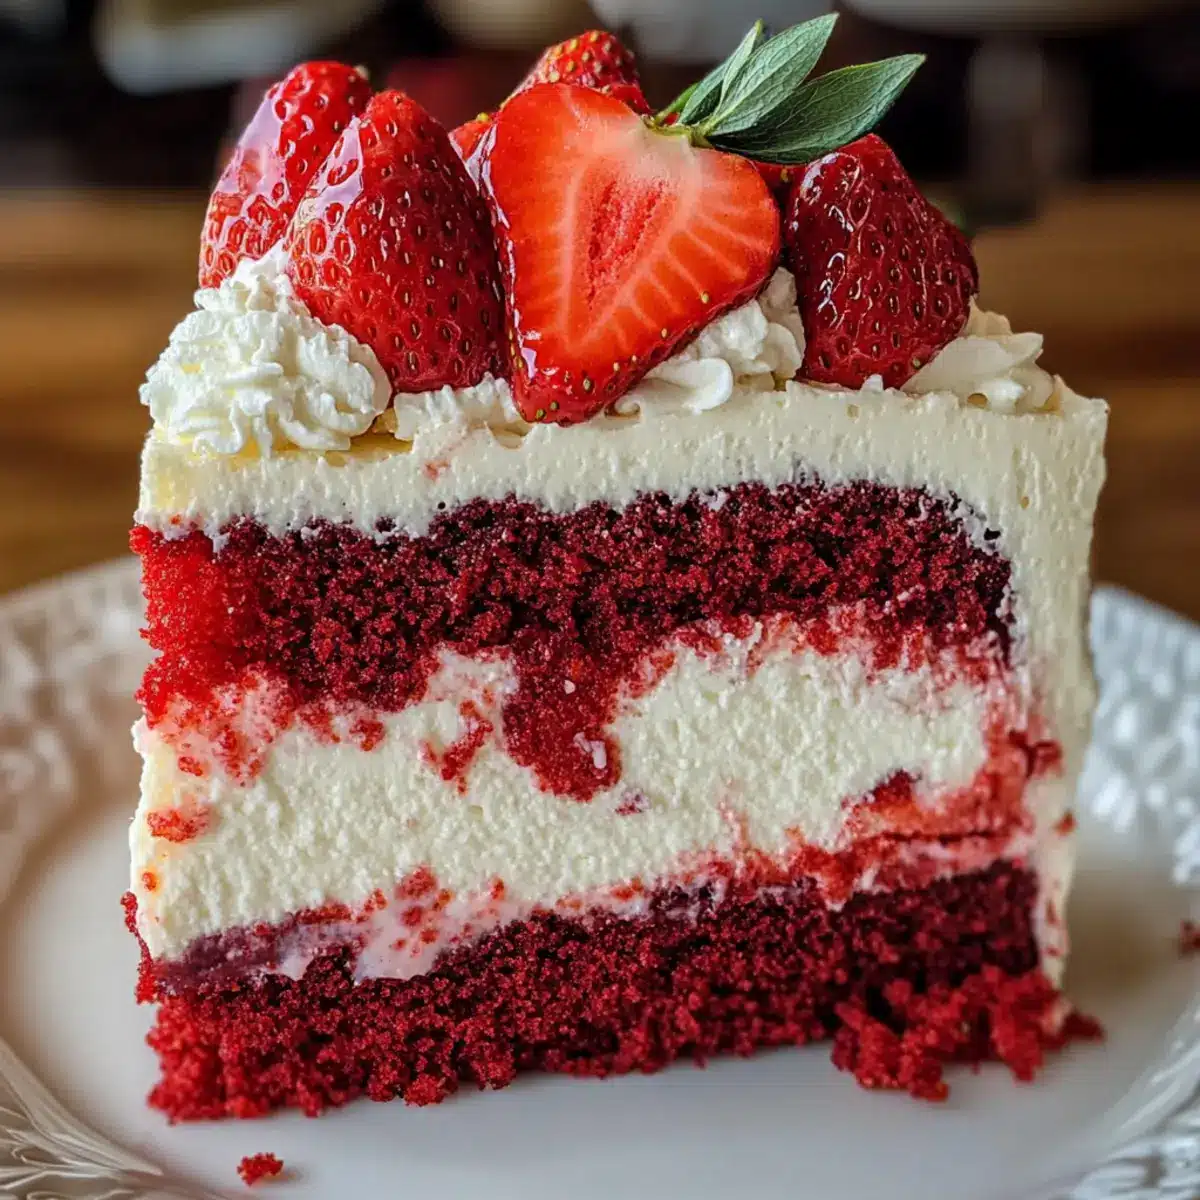
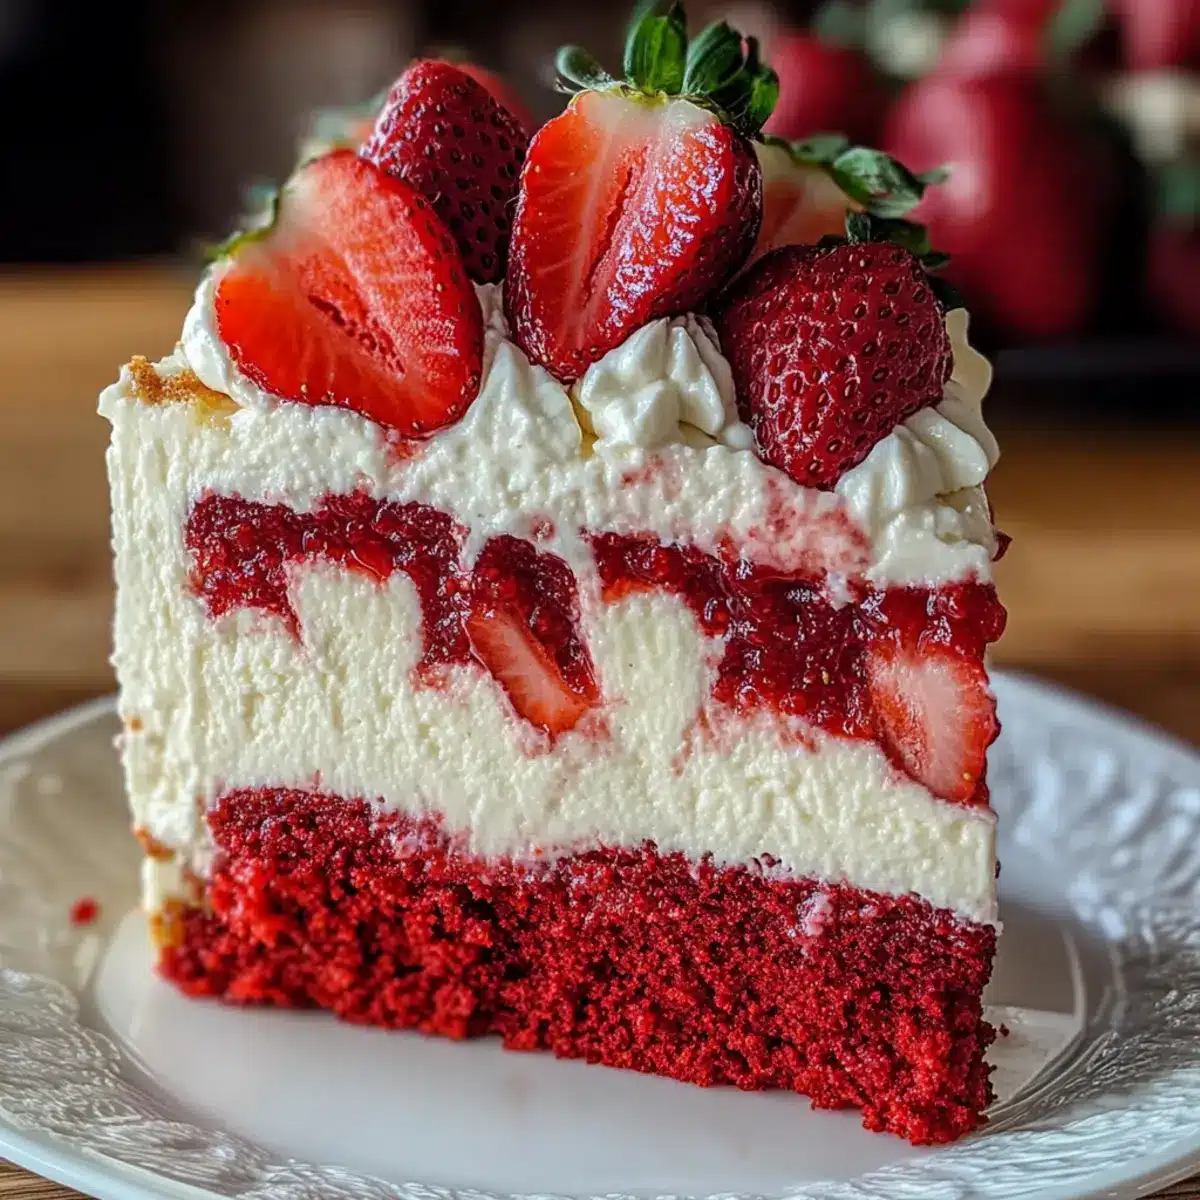
There’s something magical about a dessert that can steal the spotlight at any gathering. The Strawberries and Cream Dream Layer does just that, marrying the rich flavor of red velvet cake with the light, creamy goodness of no-bake cheesecake. This family-friendly treat is not only a feast for the eyes, but it’s also incredibly simple to whip together, making it the perfect solution for those busy days when you still want to impress. Plus, the layers of luscious strawberries create a fresh, vibrant touch that’ll leave everyone asking for seconds. Ready to elevate your dessert game? Let’s dive into this delightful recipe that promises to turn any occasion into a memorable celebration!

Why is this dessert so irresistible?
Layers of Flavor: The perfect marriage of red velvet cake and creamy no-bake cheesecake creates a dessert that’s both decadent and refreshing.
Effortless Elegance: Impress your guests without the fuss—this showcase treat is easy to prepare, making it a crowd favorite for any occasion.
Fresh Ingredients: Bright, vibrant strawberries bring a burst of freshness that complements the rich layers beautifully, making each bite a delightful experience.
Make-Ahead Convenience: Ideal for busy schedules, prepare this dessert a day in advance and let the flavors meld for a knockout dessert ready when you are.
Perfect for Sharing: Whether at family gatherings or friendly get-togethers, the Strawberries and Cream Dream Layer is sure to generate smiles and empty plates, just like my delightful Pistachio Cream Chocolate and luscious Oreo Ice Cream!
Strawberries and Cream Dream Layer Ingredients
For the Cake
- Red Velvet Cake Mix – Offers a rich flavor and stunning color; a chocolate or vanilla mix can also be used to switch things up.
- Eggs – Essential for structure; don’t consider substituting this key ingredient.
- Vegetable Oil – Keeps the cake moist; melted butter can be a tasty alternative for added richness.
- Water – Hydrates the cake mix; follow the package for proper measurements.
- Vanilla Extract – Enhances the cake’s flavor; optional if you prefer a simpler taste.
For the Cheesecake Filling
- Cream Cheese – Provides a rich and tangy base; Greek yogurt or mascarpone can lighten things up if desired.
- Heavy Cream – Whipped to create a light and fluffy texture; evaporated milk is a possible substitute, but with texture changes.
- Granulated Sugar – Sweetens the cheesecake; reduce slightly if you prefer less sweetness.
- Lemon Juice – Brightens flavors and balances sweetness; lime juice makes a fine substitute.
For the Strawberry Layers
- Fresh Strawberries – Adds vibrant color and freshness; frozen strawberries can work if fully thawed and drained.
- Cornstarch – Thickens the strawberry compote for a glossy finish; no direct substitute unless you use a similar thickening agent.
- Granulated Sugar – Enhances the sweetness of fresh strawberries; adjust to your taste.
Optional Ingredients
- Parchment Paper – Prevents cakes from sticking; while there’s no substitute, careful greasing can sometimes work.
Elevate your dessert experience with this Strawberries and Cream Dream Layer that harmonizes flavors and textures in every mouthful!
Step‑by‑Step Instructions for Strawberries and Cream Dream Layer
Step 1: Preheat Your Oven
Begin by preheating your oven to the temperature specified on the red velvet cake mix package, typically around 350°F (175°C). While the oven warms up, take a moment to prepare your workspace. Gather your mixing bowls and measuring cups, ensuring you have everything you need for creating the delightful layers in your Strawberries and Cream Dream Layer.
Step 2: Prepare Cake Pans
Grease two round cake pans with vegetable oil or butter to prevent sticking. For added security, line the bottoms with parchment paper, ensuring the cakes release perfectly. As you prepare the pans, get excited—soon your kitchen will be filled with the delicious aroma of baking red velvet cake!
Step 3: Mix Cake Ingredients
In a large mixing bowl, combine the red velvet cake mix, eggs, vegetable oil, and water as directed on the package. If you choose to enhance the flavor, stir in the optional vanilla extract. Use a hand mixer to blend the ingredients until the batter is smooth and glossy. Once mixed, evenly divide the batter between the two prepared pans, creating the foundation for your Strawberries and Cream Dream Layer.
Step 4: Bake the Cake Layers
Place the filled cake pans in the preheated oven and bake according to the package instructions, usually for 25-30 minutes. Keep an eye on them! When a toothpick inserted into the center comes out clean and the edges pull away slightly from the pans, they are perfectly done. Allow the layers to cool in the pans for 10 minutes.
Step 5: Cool and Level the Cakes
After cooling in the pans, carefully transfer the cake layers to wire racks to cool completely. Once cooled, use a serrated knife to level the tops of the red velvet cakes if they’re domed. This creates an even base for the creamy layers of the Strawberries and Cream Dream Layer, ensuring stability and a polished look.
Step 6: Prepare the Strawberries
While the cake cools, wash and slice fresh strawberries into thin pieces. In a medium bowl, sprinkle them with granulated sugar, gently tossing to combine. Allow the strawberries to macerate for 10-15 minutes, releasing their natural juices, which will make them sweet and delicious for your dessert.
Step 7: Make the Strawberry Compote
In a saucepan over medium heat, combine diced strawberries, granulated sugar, and lemon juice. Stir gently, allowing the mixture to cook for about 5 minutes until the strawberries soften. To thicken, whisk cornstarch with a small amount of water, then stir it into the strawberry mixture, cooking for another minute until it reaches a glossy, thickened consistency.
Step 8: Prepare the Cheesecake Filling
In a mixing bowl, beat softened cream cheese with granulated sugar and lemon juice until it’s smooth and creamy. In another bowl, whip heavy cream until stiff peaks form. Gently fold the whipped cream into the cream cheese mixture until fully combined, creating a luscious filling for your Strawberries and Cream Dream Layer.
Step 9: Assemble the Layers
On a serving platter, place one of the cooled red velvet cake layers. Spread a generous amount of the cheesecake filling on top, followed by a layer of the macerated strawberries. Spoon some of the strawberry compote over the top, and then repeat the process with the second cake layer, ensuring a delightful balance of flavors and textures.
Step 10: Chill Before Serving
Cover your assembled Strawberries and Cream Dream Layer with plastic wrap and refrigerate for at least 4 hours, or preferably overnight. This chilling time allows the flavors to meld beautifully and the cheesecake filling to set up properly. You’ll be rewarded with a stunning dessert that’s easy to slice and serve!
Step 11: Serve and Enjoy
When ready to serve, slice the Strawberries and Cream Dream Layer into beautiful wedges. Serve at room temperature or slightly chilled for the best taste experience. Enjoy the delightful combination of red velvet, creamy cheesecake, and fresh strawberries with your family and friends!
What to Serve with Strawberries and Cream Dream Layer
Light and delightful, this dessert pairs beautifully with a variety of complementing flavors and textures that enhance every slice.
- Whipped Cream: A cloud of light, airy whipped cream adds an indulgent touch that rounds out the creamy finish of the dessert.
- Chocolate Drizzle: A warm drizzle of chocolate ganache provides a rich contrast to the sweet strawberries and adds elegance to the presentation.
- Fresh Mint Leaves: Adding a sprinkle of fresh mint elevates the dessert with herbaceous brightness, balancing the richness of the cheesecake.
- Powdered Sugar Dusting: A light dusting of powdered sugar creates a beautiful, sweet finish that makes the layers pop, enhancing visual allure.
- Vanilla Ice Cream: Creamy vanilla ice cream complements the cake’s flavors delightfully. The coolness against the berries is utterly refreshing.
- Sparkling Prosecco: A glass of bubbly Prosecco enhances the celebratory feel, while its crispness cuts through the sweetness, making it a perfect pairing.
- Fruit Salad: A side of colorful fruit salad brings additional freshness and texture, with various flavors dancing harmoniously alongside the dessert.
- Lemon Sorbet: This tart and refreshing sorbet cleanses the palate beautifully, providing a refreshing contrast to the rich layers of the cake.
- Classic Cheesecake Bites: For dessert enthusiasts, pairing this treat with mini cheesecake bites will create a delightful dessert table that pleases all!
Expert Tips for the Strawberries and Cream Dream Layer
-
Cooling Time: Allow the cake layers to cool completely before assembling. This prevents melting the cheesecake filling and ensures a clean slice.
-
Smooth Spreading: Utilize an offset spatula to create a smooth and even layer of cheesecake filling. This makes the dessert visually appealing.
-
Gentle Whipping: When whipping the cream, do it gently to maintain the airy texture. Overmixing can lead to a denser cheesecake filling.
-
Substitution Cautions: If using alternate ingredients, like Greek yogurt instead of cream cheese, expect differences in texture and flavor—experiment carefully.
-
Decorative Touches: Feel free to garnish with extra strawberries or a dusting of powdered sugar before serving for an elegant presentation that enhances the Strawberries and Cream Dream Layer.
-
Storage Matters: Keep leftovers in an airtight container in the fridge for optimal freshness, ideally for up to 4 days.
Strawberries and Cream Dream Layer Variations
Feel free to personalize your dessert to suit your tastes and dietary needs with these exciting variations!
-
Greek Yogurt Filling: Substitute cream cheese with Greek yogurt for a lighter, tangy cheesecake layer. This variation remains rich yet adds a refreshing twist to each bite!
-
Different Cake Flavors: Replace red velvet cake mix with vanilla or lemon cake mix to create new flavor profiles. Each cake will lend its unique touch, transforming your dessert into something entirely new and delightful.
-
Herb-Infused Compote: Enhance your strawberry compote with fresh basil or mint for an aromatic twist. The subtle herbal notes will elevate the strawberries, turning a classic into a gourmet experience.
-
Lower Sugar Option: Reduce the amount of granulated sugar in both the strawberries and cheesecake filling. This allows the natural sweetness of the ingredients to shine while still delivering a deliciously satisfying dessert.
-
Vegan Adaptation: Use plant-based cream cheese and dairy-free whipped cream for the cheesecake filling, and replace eggs with a flaxseed mixture for a delicious vegan version. This option ensures everyone can enjoy this delightful dessert!
-
Chocolate Drizzle: If you’re a chocoholic, drizzle melted chocolate over the assembled layers before chilling. This rich addition will bring an indulgent richness that complements the strawberries beautifully.
-
Spicy Heat: Add a pinch of cayenne pepper or a dash of chili powder to the strawberry compote for a surprising kick. The heat plays off the sweetness, creating a captivating flavor contrast you’ll love!
By playing around with these variations, you can craft a unique experience for your dessert while still basking in the dreamy goodness of strawberries and cream. If you’d like further inspiration, check out my Creamy Cauliflower Soup for a comforting dish or my delightful Smoked Salmon Cream Puffs to start your meal on a savory note!
Storage Tips for Strawberries and Cream Dream Layer
Fridge: Store any leftovers in an airtight container in the refrigerator for up to 4 days. This keeps the creamy layers fresh and the strawberries vibrant.
Freezer: If you’d like to save the dessert for later, freeze individual slices wrapped in plastic wrap and aluminum foil for up to 2 months. Thaw in the fridge overnight before serving.
Reheating: For the best flavor experience, serve the Strawberries and Cream Dream Layer chilled or at room temperature. Avoid reheating, as it may affect the texture of the cheese filling.
Make-Ahead: This dessert is perfect for making a day in advance; just allow the flavors to meld and the cheesecake to set properly in the fridge overnight before serving.
Make Ahead Options
The Strawberries and Cream Dream Layer is perfect for busy home cooks looking to save time! You can bake the red velvet cake layers and prepare the creamy cheesecake filling up to 24 hours in advance. Simply cool the cakes completely and wrap them tightly in plastic wrap, refrigerating the filling separately. The macerated strawberries can also be prepped and stored in the fridge for up to 3 days. When it’s time to serve, assemble the layers just before your event, spooning the strawberry compote over the top for a fresh flourish. This prep ahead strategy not only saves time but ensures that your dessert is just as delicious when it’s time to impress your family and friends!
Strawberries and Cream Dream Layer Recipe FAQs
What should I look for when selecting strawberries?
Absolutely! You’re looking for fresh strawberries with a bright red color and a shiny exterior. Avoid ones with dark spots or a mushy texture. If you’re using frozen strawberries, make sure to thaw them completely and drain any excess liquid to maintain the dessert’s integrity.
How should I store leftovers of the Strawberries and Cream Dream Layer?
To keep your dessert fresh, store any leftovers in an airtight container in the refrigerator for up to 4 days. This will maintain the creamy texture of the cheesecake and the vibrant flavors of the strawberries. If left out, the strawberries can lose their firmness and the dessert can become soggy.
Can I freeze the Strawberries and Cream Dream Layer?
Yes, you can freeze this dessert! Wrap individual slices in plastic wrap, then wrap in aluminum foil to prevent freezer burn. It can be frozen for up to 2 months. When ready to enjoy, simply transfer the slices to the refrigerator overnight to thaw, allowing all those delicious flavors to return to their creamy state!
Why is my cheesecake filling too dense?
If your cheesecake filling turns out too dense, it may be due to overmixing the heavy cream or not whipping it to stiff peaks first. Always whip the cream separately until it’s airy, then fold it gently into the cream cheese mixture using a spatula. This will help maintain the lightness of the filling.
I have a dairy allergy. Can I make this dessert dairy-free?
Absolutely! You can substitute the cream cheese with a dairy-free cream cheese alternative, and use coconut cream instead of heavy cream for the filling. Additionally, make sure to choose a dairy-free cake mix. Always check labels for hidden dairy ingredients as some mixes can vary.
How long should I chill the dessert before serving?
It’s best to chill the Strawberries and Cream Dream Layer for at least 4 hours, but ideally, overnight is perfect! This allows all the flavors to meld beautifully and helps the cheesecake filling to set perfectly for a clean slice when you’re ready to serve.
Strawberries and Cream Dream Layer: Indulge in Pure Bliss
Ingredients
Equipment
Method
- Preheat your oven to the temperature specified on the red velvet cake mix package, typically around 350°F (175°C).
- Grease two round cake pans with vegetable oil or butter and line with parchment paper.
- In a large mixing bowl, combine red velvet cake mix, eggs, vegetable oil, and water as directed on the package.
- Place filled cake pans in the preheated oven and bake according to package instructions, usually for 25-30 minutes.
- After baking, allow the layers to cool in the pans for 10 minutes and then transfer to wire racks.
- Wash and slice fresh strawberries, sprinkle with granulated sugar, and allow to macerate for 10-15 minutes.
- In a saucepan, combine diced strawberries, granulated sugar, and lemon juice; cook for 5 minutes. Thickening with cornstarch mixed with water.
- Beat softened cream cheese, granulated sugar, and lemon juice until smooth, then fold in whipped cream.
- Assemble the layers by placing one cake layer, topping with cheesecake filling, macerated strawberries, and compote, repeating with the second layer.
- Cover and refrigerate for at least 4 hours or preferably overnight before serving.
- Slice into wedges to serve at room temperature or slightly chilled.
Leave a Reply