
As I stood in my kitchen, a delightful aroma wafted through the air, bringing back memories of baking with my grandmother. It was a cozy moment, turning flour and sugar into happiness; now, I’m thrilled to share a twist on that nostalgia with my 4-Ingredient Crispy Chocolate Oat Cookies. These easy treats strike the perfect balance between a crispy edge and a chewy center, making them an ideal reward for a long day. Not only are they quick to whip up, but they also cater to those looking for a guilt-free indulgence, especially when made gluten-free with certified oats. Let’s dive into this uncomplicated yet delicious recipe that guarantees a wholesome snack and will surely win over your family. What delicious spins will you add to your batch?

Why Are These Cookies a Must-Try?
Simplicity at its finest: With just four ingredients, you can whip up these cookies in no time.
Guilt-free indulgence: Made gluten-free with certified oats, they’re perfect for health-conscious snackers.
Customization galore: From almond butter to dried fruits, feel free to get creative with your mix-ins!
No baking required: Simply chill them in the fridge to set, making them a hassle-free treat.
Crowd-pleasing flavor: The rich chocolate combined with hearty oats will have everyone reaching for seconds!
Looking for more easy recipes? Check out this comforting Cabbage Roll Casserole or delightful French Toast Casserole for delicious meal inspiration.
Chocolate Oat Cookie Ingredients
• Key to Deliciousness: These easy chocolate oat cookies are made with just four ingredients, perfect for a quick and satisfying treat.
For the Cookie Base
- Oats – provide structure and texture; opt for rolled oats for the best outcome.
- Peanut Butter – acts as the primary binder and offers a creamy flavor; almond butter is a great nut-free substitute.
- Honey or Maple Syrup – delivers natural sweetness; maple syrup works beautifully for a vegan alternative.
- Chocolate Chips – adds indulgent chocolatey goodness; feel free to swap with dried fruits or nuts for a delightful twist.
Step‑by‑Step Instructions for Easy Sausage and Egg Casserole
Step 1: Prepare the Oven and Dish
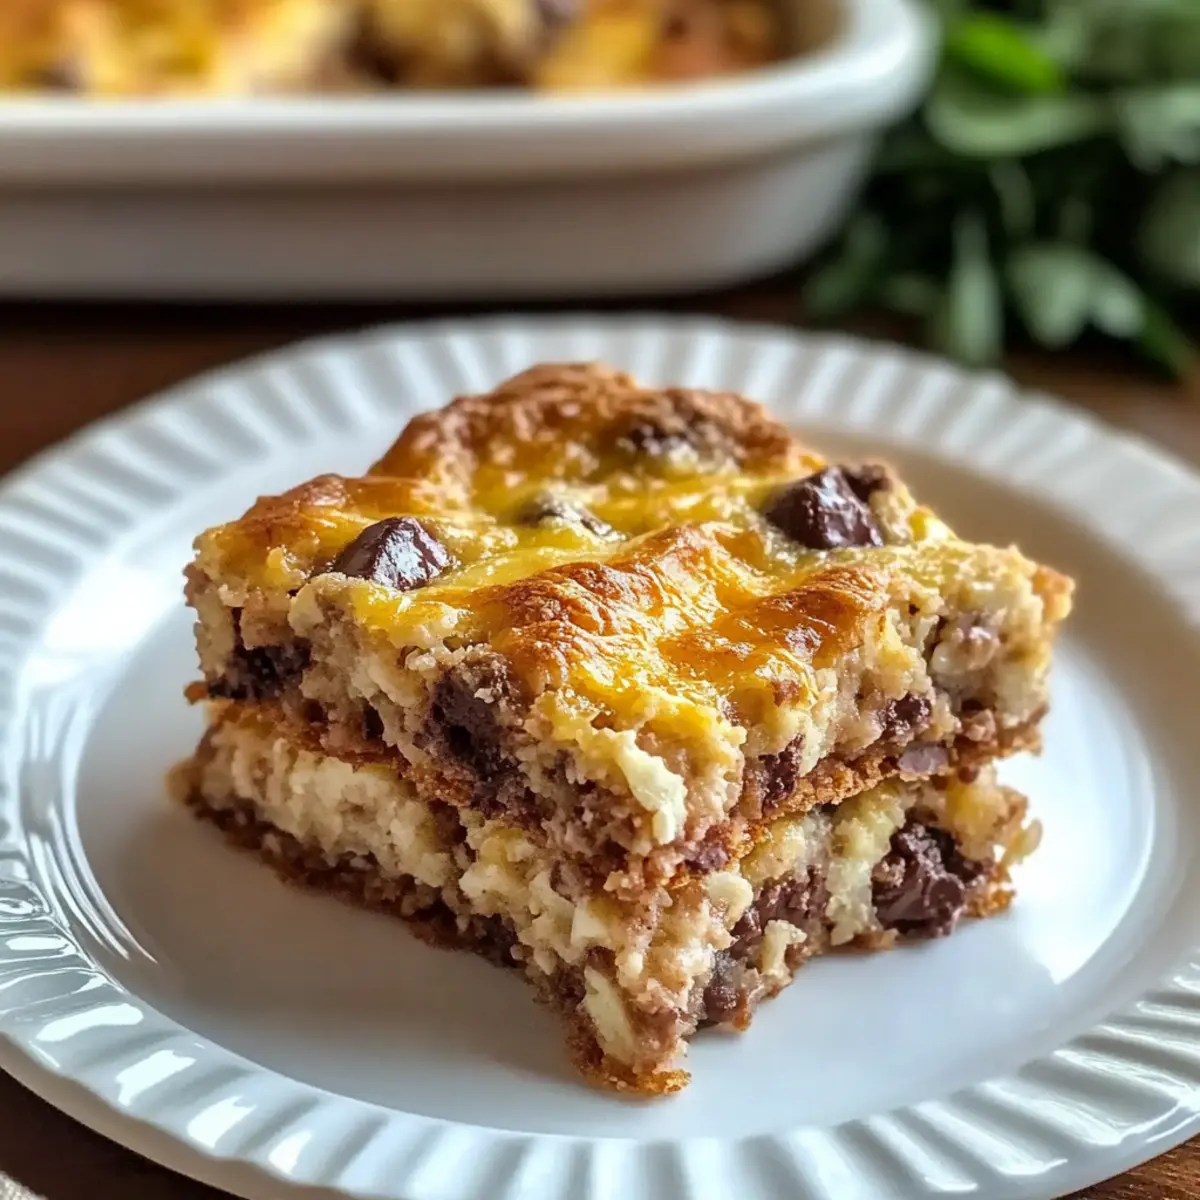
Preheat your oven to 350°F (175°C). While the oven warms up, grease a 9×13 inch baking dish with cooking spray or butter to prevent sticking. This step ensures that your Easy Sausage and Egg Casserole will bake evenly and release easily once cooked, giving you a perfect base for your hearty breakfast.
Step 2: Cook the Sausage
In a large skillet over medium heat, add approximately one pound of your favorite sausage and cook it for about 5–7 minutes, breaking it apart with a spatula as it browns. Cook until the sausage is no longer pink and reaches a temperature of 160°F (70°C). This step infuses rich flavors into your casserole while ensuring the meat is safe to eat.
Step 3: Whisk the Eggs
In a large mixing bowl, crack 8–10 eggs and whisk them vigorously until well combined. Add in a splash of milk, salt, and pepper for seasoning. This mixture will become the creamy custard base for your Easy Sausage and Egg Casserole, blending perfectly with the sausage and adding richness to each bite.
Step 4: Combine Ingredients
Once the sausage is cooked, spread it evenly across the bottom of the greased baking dish. Pour the egg mixture over the sausage, ensuring even distribution. Add shredded cheese on top, if desired, and give it a gentle stir to mix everything together slightly. This step layers the flavors, ensuring every bite of your casserole is deliciously indulgent.
Step 5: Bake the Casserole
Place the baking dish in the preheated oven and bake for 25–30 minutes or until the eggs are set and the edges are lightly golden. You’ll know it’s done when a knife inserted in the center comes out clean. This step creates a beautiful, fluffy texture in your Easy Sausage and Egg Casserole that’s simply irresistible.
Step 6: Cool and Serve
Once baked, remove the casserole from the oven and let it cool for about 5–10 minutes before slicing. This cooling time helps the layers set, making it easier to serve. Cut into squares and enjoy while warm, either on its own or with your favorite breakfast sides. Each bite is a comforting reminder of cozy mornings around the table!

Easy Sausage and Egg Casserole Variations
Feel free to mix things up with delightful twists that enhance your casserole experience!
-
Vegetarian:
Swap the sausage for sautéed spinach, mushrooms, and bell peppers for a colorful, plant-based version. The earthy veggies bring a fresh flavor that everyone will love. -
Cheesy Delight:
Add a blend of your favorite cheeses, like sharp cheddar and mozzarella, melting into each layer for an indulgent, gooey texture. The cheesy goodness takes this dish to the next level! -
Spicy Kick:
Incorporate diced jalapeños or hot sausage for a zesty kick. A bit of heat adds excitement that warms you from the inside out—perfect for those who love a little spice in their life! -
Herb Infusion:
Experiment with fresh herbs like parsley, chives, or thyme mixed into the egg mixture. This small touch brightens up the flavor profile, creating a beautifully aromatic dish. -
Hash Brown Base:
Layer frozen hash browns at the bottom of the baking dish before adding sausage and eggs for an irresistibly crispy texture. This adds a delightful crunch to each bite! -
Whole Wheat Option:
Use whole wheat bread cubes instead of the traditional sausage base for a fiber-rich twist. This provides both substance and a heartiness that keeps you feeling satisfied. -
Make-Ahead Convenience:
Prepare the casserole the night before and refrigerate overnight. This allows the flavors to meld beautifully, making your morning routine even easier and tastier.
For more easy recipe inspiration, try my comforting Southern Squash Casserole next time!
Storage Tips for Chocolate Oat Cookies
- Room Temperature: Keep cookies in an airtight container at room temperature for up to 1 week to maintain freshness while enjoying your delicious easy chocolate oat cookies.
- Fridge: For extended freshness, store in the fridge for up to 2 weeks. Just make sure to use an airtight container to prevent them from drying out.
- Freezer: Freeze cookies in a single layer on a baking sheet, then transfer to a zip-top bag. They can be frozen for up to 3 months for a quick treat anytime!
- Reheating: Simply thaw at room temperature or warm in the microwave for 10-15 seconds for a delightful, chewy cookie experience!
Expert Tips for 4-Ingredient Cookies
- Combine Well: Ensure all ingredients are mixed thoroughly for even distribution of flavors; a poorly mixed dough can lead to uneven cookies.
- Proper Portioning: Use a tablespoon-sized scoop for each cookie; this helps achieve consistent size and perfect texture in your easy cookies.
- Chill Time: Don’t skip refrigerating the cookies for at least 30 minutes. This step helps them set properly and enhances their chewy texture.
- Experiment with Flavors: Feel free to swap out the chocolate chips for dried fruits or nuts, adding new dimensions to your easy chocolate oat cookies.
- Customize for Texture: Toasting the oats lightly before mixing can give your cookies an extra crunch, elevating the flavor and texture.
Make Ahead Options
These 4-Ingredient Crispy Chocolate Oat Cookies are perfect for meal prep! You can prepare the dough up to 24 hours in advance by mixing the oats, peanut butter, honey or maple syrup, and chocolate chips, then storing it in an airtight container in the refrigerator. This not only saves time but also deepens the flavor as it rests. When you’re ready to enjoy them, simply scoop the chilled mixture onto a lined baking sheet, flatten each cookie, and refrigerate for about 30 minutes to firm them up before serving. They’ll be just as delicious, making your busy weeknights feel effortless and sweet!
What to Serve with 4-Ingredient Crispy Chocolate Oat Cookies?
There’s nothing quite like a homemade treat that pairs beautifully with other delicious bites, creating a memorable meal experience.
-
Creamy Yogurt Bowl: Top your favorite Greek yogurt with crumbled cookies for a delightful crunch and creamy contrast. It’s a match made in heaven!
-
Fresh Berries: A handful of juicy strawberries or raspberries will brighten up the cookie’s rich chocolate flavor, adding a refreshing and fruity twist to your snack time.
-
Nutty Trail Mix: Mix your cookies with a handful of trail mix for an uplifting boost of energy, making them a perfect companion for afternoon adventures. The extra crunch and varied textures keep things interesting!
-
Decadent Hot Chocolate: Sip on a warm mug of hot chocolate to dip your cookies into, creating a cozy experience perfect for any chilly day. The rich chocolate flavors beautifully complement each other.
-
Milk for Dipping: A classic pairing—nothing embraces the crispiness of the cookie better than a cold glass of milk, enhancing each bite with creamy goodness.
-
Homemade Ice Cream: Crumble these cookies over a scoop of vanilla or chocolate ice cream for an indulgent dessert that takes your treat to a whole new level. The combination of textures is irresistibly delightful!
-
Coffee or Espresso: The bitterness of a freshly brewed coffee enhances the sweet chocolate flavors and chewy texture of the cookies, creating a sophisticated snack perfect for an afternoon pick-me-up.
Chocolate Oat Cookies Recipe FAQs
What kind of oats should I use for the cookies?
I recommend using rolled oats for the best texture and structure. Instant oats can lead to a mushier cookie, while steel-cut oats won’t hold up well in this recipe. Opt for certified gluten-free oats if you need a gluten-free option.
How should I store the cookies after making them?
Store your cookies in an airtight container at room temperature for up to one week. If you want them to last longer, you can refrigerate them for up to two weeks, just remember to keep them sealed to maintain their freshness.
Can I freeze these cookies for later?
Absolutely! To freeze, place the cookies in a single layer on a baking sheet, ensuring they’re not touching. Freeze for 1-2 hours, then transfer them to a zip-top bag, removing as much air as possible. They can be stored this way for up to 3 months. When you’re ready to enjoy, simply thaw at room temperature for a few minutes, or heat them in the microwave for about 10-15 seconds.
What should I do if my cookie mixture is too crumbly?
If your mixture feels too crumbly, it might be due to too much dry ingredient or not enough wet. Try adding a bit more peanut butter or honey/maple syrup, one teaspoon at a time, mixing well after each addition until you reach a sticky yet moldable consistency. This should bring everything together beautifully.
Are these cookies safe for those with nut allergies?
If you need to make these cookies nut-free, simply substitute peanut butter with sunflower seed butter or a similar seed butter. Always check ingredient labels to avoid cross-contamination, ensuring your treats remain safe for those with allergies.
What can I add to customize the flavor of the cookies?
Feel free to experiment! You can mix in shredded coconut, chopped nuts, or different types of chocolate chips (like dark or white) for a fun twist. Alternatively, consider adding spices like cinnamon or vanilla extract to elevate the flavor profile and give your cookies a unique personality.

Easy Sausage and Egg Casserole for Effortless Mornings
Ingredients
Equipment
Method
- Preheat your oven to 350°F (175°C) and grease a 9x13 inch baking dish.
- In a skillet, cook the sausage over medium heat for 5-7 minutes.
- Whisk the eggs in a mixing bowl and add milk, salt, and pepper.
- Spread the cooked sausage in the baking dish, pour egg mixture over it, and stir gently.
- Bake for 25-30 minutes until the eggs are set and golden.
- Allow to cool for 5-10 minutes before serving.
Leave a Reply