
As I stood in the kitchen, the enticing aroma of caramel gently bubbling away brought back memories of crisp autumn days and family gatherings. These Mini Caramel Apple Dessert Cups capture that nostalgic essence perfectly, combining tart Granny Smith apples, creamy vanilla pudding, and a heavenly drizzle of salted caramel. What’s great about this comforting dessert is how simple it is to whip up—ideal for impressing guests or enjoying as a cozy night-in treat. Plus, with gluten-free and dairy-free options available, everyone can relish in this delightful creation. Ready to indulge your senses and create a show-stopping dessert? Let’s dive in!

Why Are These Dessert Cups So Irresistible?
Nostalgic Flavors: Each spoonful evokes cozy autumn memories, making them perfect for gatherings.
Quick and Easy: With simple steps and minimal prep, you’ll have an elegant dessert in no time!
Versatile Options: Customizable for gluten-free and dairy-free diets, everyone can enjoy them.
Crowd-Pleasing Delight: These cups are sure to impress, whether for a dinner party or a family night in.
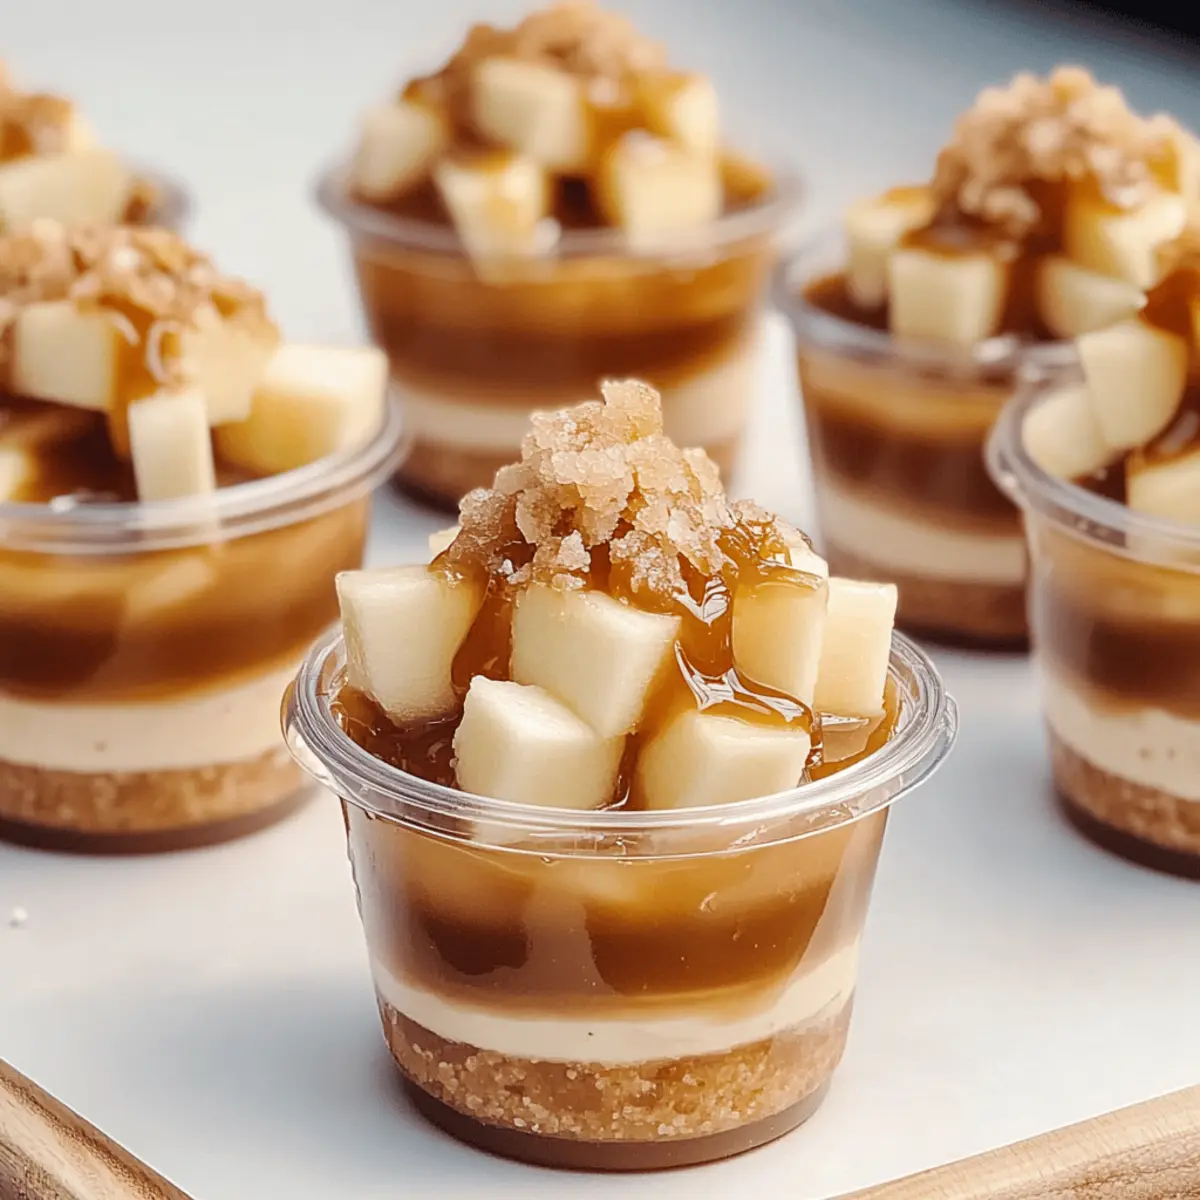
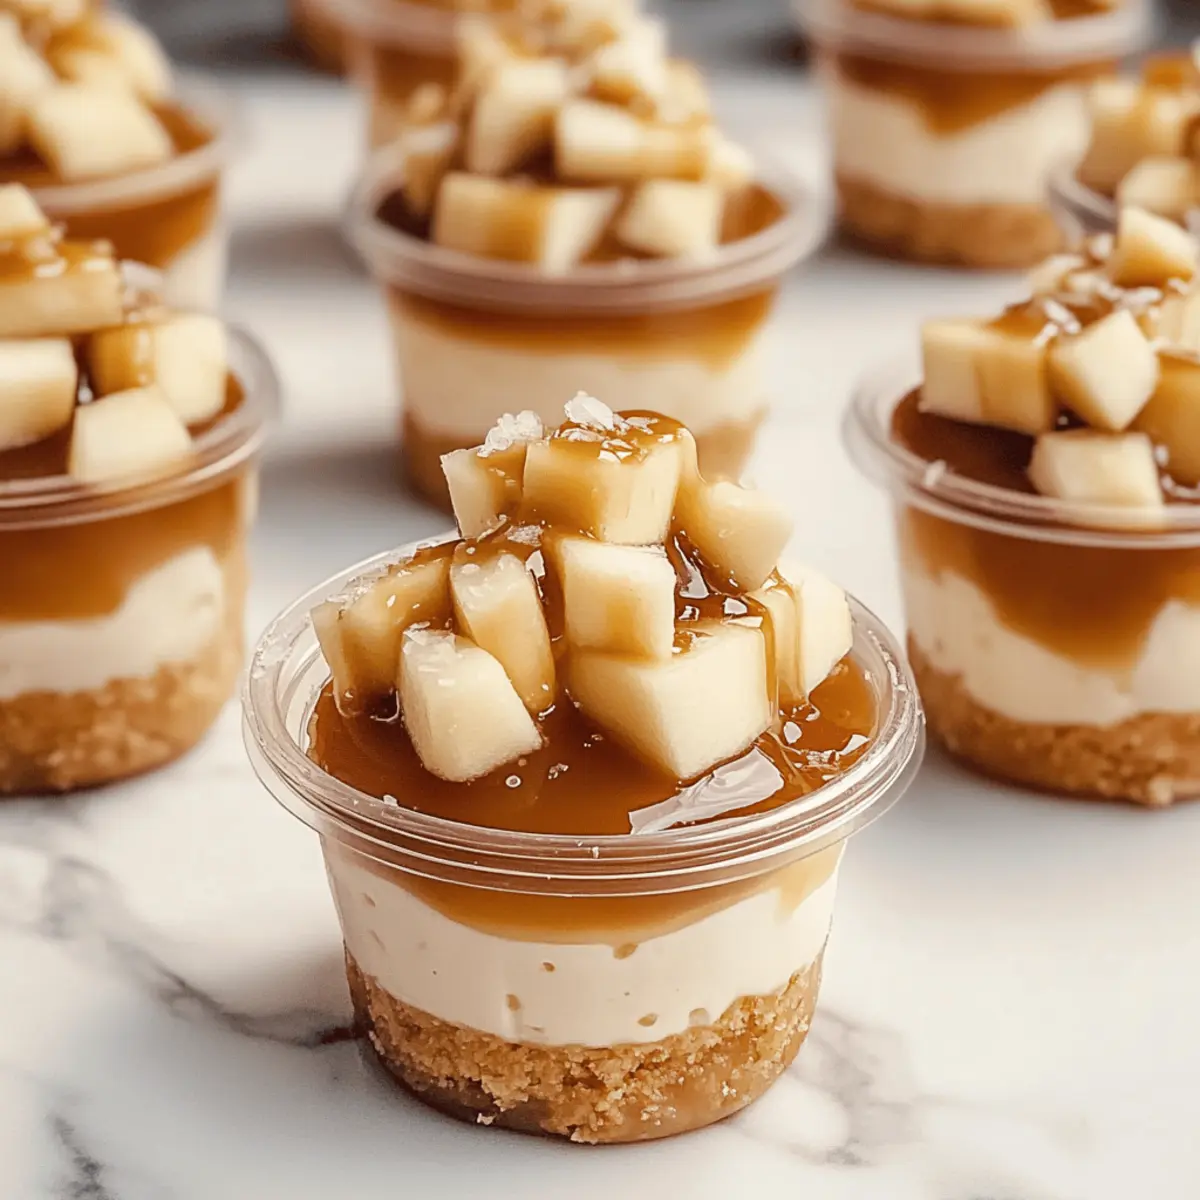
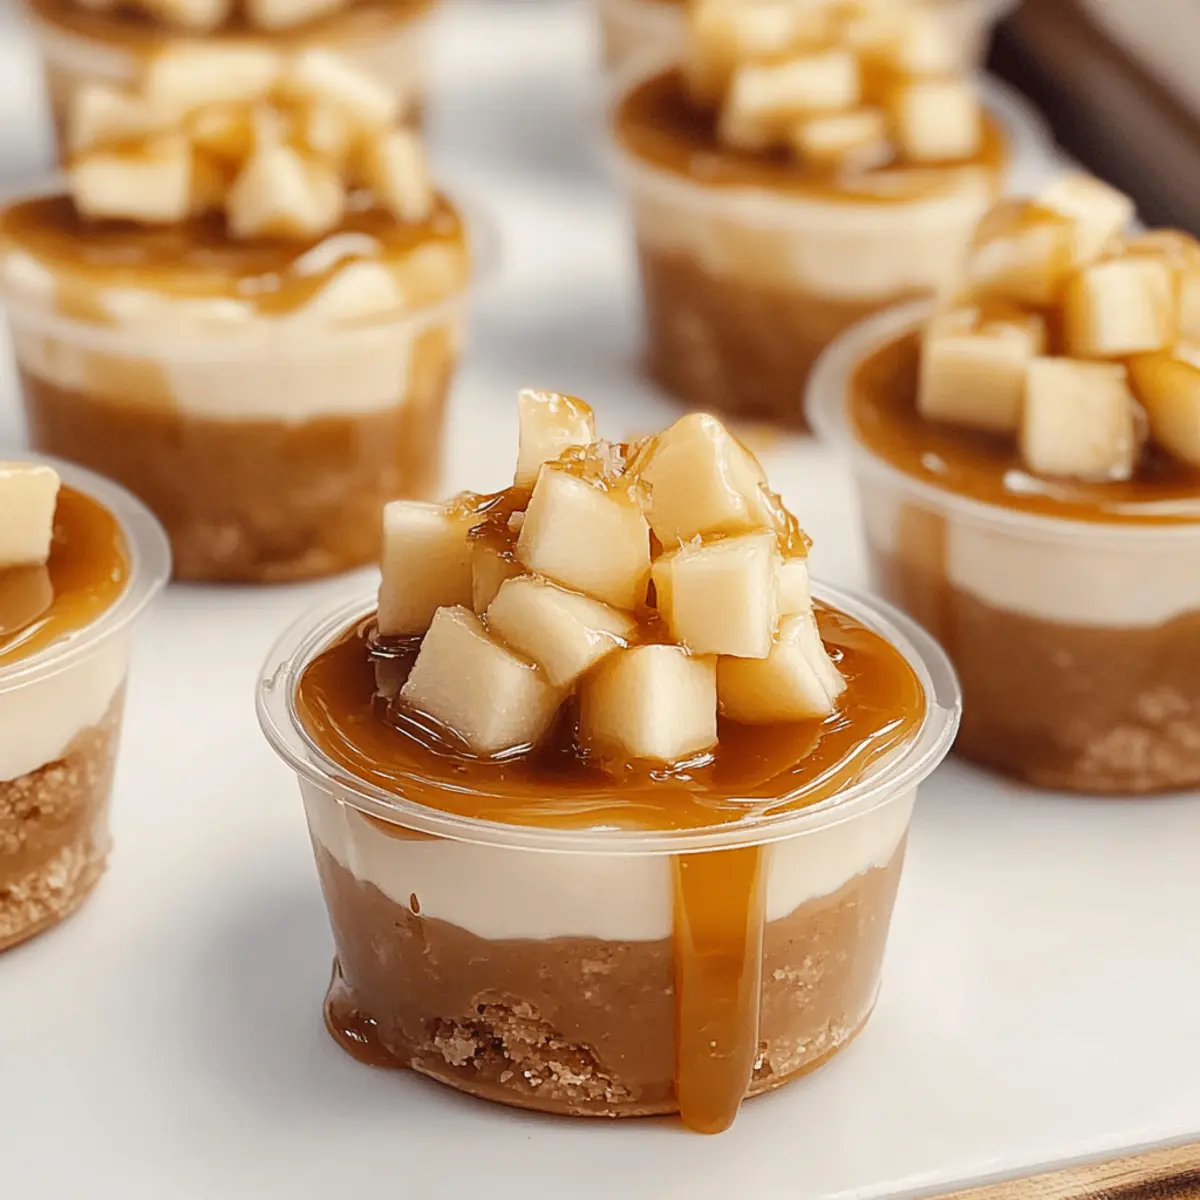
Decadent Layers: The combination of crispy wafers, creamy pudding, and sweet apples creates a delightful texture.
Ideal Any Occasion: From holidays to casual gatherings, these Mini Caramel Apple Dessert Cups are always a hit!
Mini Caramel Apple Dessert Cups Ingredients
For the Apple Filling
• Granny Smith Apples – Tartness balances perfectly with caramel’s sweetness; use firm apples for the best results.
• Light Brown Sugar – Adds a rich, molasses flavor to enhance the apple filling; white sugar can be used for a lighter taste.
• Salted Butter – Provides creaminess in both the apple filling and crust; unsalted butter is an alternative; just add a pinch of salt.
• Ground Cinnamon – Infuses warmth and a delightful aroma; a dash of nutmeg can be added for extra spice.
For the Crust
• Crushed Vanilla Wafers – Creates a sweet, crunchy base; graham crackers work for a similar texture if you prefer.
• Salted Butter – This helps bind the wafers; choose unsalted butter and a pinch of salt if needed.
For the Pudding Layer
• Instant Vanilla Pudding Mix – Ensures a smooth, creamy consistency in the pudding; vanilla custard powder can be used instead.
• Cold Whole Milk – Key for a creamy pudding texture; use almond or oat milk for a dairy-free option.
• Cold Heavy Whipping Cream – Whipped to soft peaks for a light, airy pudding layer; coconut cream serves as a dairy-free substitute here.
For the Caramel Drizzle
• Salted Caramel Sauce – Drizzle to elevate the dessert’s flavor; homemade or store-bought, just ensure it’s nut-free if allergies are a concern.
• Extra Caramel Sauce – For generous drizzles over each cup; consider using a sugar-free version if desired.
Get ready to assemble your comforting and delectable Mini Caramel Apple Dessert Cups!
Step‑by‑Step Instructions for Mini Caramel Apple Dessert Cups
Step 1: Prepare the Apple Filling
Begin by peeling, coring, and dicing 2 medium Granny Smith apples into small pieces. In a mixing bowl, combine the diced apples with ¼ cup of light brown sugar, 2 tablespoons of salted butter, and ½ teaspoon of ground cinnamon. Stir the mixture thoroughly until the apples are well coated. Let this sit for about 10-15 minutes to allow the flavors to meld while you prepare the crust.
Step 2: Make the Crust
In a medium bowl, combine 1 cup of crushed vanilla wafers with 4 tablespoons of melted salted butter. Mix them together until the crumbs are fully moistened and resemble wet sand. This mixture will serve as the crunchy base for your Mini Caramel Apple Dessert Cups. Press the crust mixture firmly into the bottom of your serving cups or small jars, creating a stable layer, and set them aside.
Step 3: Whisk the Pudding
In a separate large bowl, whisk together 1 package (3.4 ounces) of instant vanilla pudding mix with 2 cups of cold whole milk. Stir the mixture for about 2 minutes until it thickens to a smooth consistency. You’ll notice it should be creamy and free of lumps. This delicious pudding layer will complement your dessert cups beautifully. Set aside for a moment to allow it to continue thickening while you whip the cream.
Step 4: Whip the Cream
In a separate bowl, using an electric mixer, whip 1 cup of cold heavy whipping cream on medium-high speed until soft peaks form—this should take about 3-5 minutes. The whipped cream should be fluffy and hold its shape. Be careful not to overwhip, as you want it to remain light and airy for your pudding layer. Once ready, gently fold the whipped cream into the thickened pudding using a spatula until combined, creating a luscious, creamy layer.
Step 5: Layer the Cups
Now it’s time to assemble your Mini Caramel Apple Dessert Cups! Begin by adding a layer of the apple filling over the crust in each cup. Next, scoop a generous amount of the pudding mixture over the apples, smoothing it out. Repeat these layers until you reach the top of each cup, finishing with a pudding layer. Aim for beautiful layers to showcase each component’s texture and color.
Step 6: Drizzle Caramel
Once your cups are layered, it’s time to add the sweet finishing touch! Take your salted caramel sauce and drizzle a generous amount over the top of each pudding layer. Use a spoon or a squeeze bottle for a more decorative effect. This rich caramel glaze enhances the visual appeal and adds an extra layer of flavor to your Mini Caramel Apple Dessert Cups, making them even more irresistible.
Step 7: Chill
Cover each cup with plastic wrap or a lid and refrigerate them for at least 1 hour before serving. This chilling period allows the flavors to meld and ensures the layers stay intact for a delightful presentation. The cooling time also helps the caramel to slightly thicken on top, making for a beautiful finish. When ready, remove from the fridge and enjoy the comforting flavors of your Mini Caramel Apple Dessert Cups!
Mini Caramel Apple Dessert Cups: Variations & Substitutions
Feel free to get creative with these delightful cups, making them your own by customizing flavors and textures!
-
Nut-Free: Use Graham crackers in place of vanilla wafers to create a similar crunchy base without the nuts.
Don’t let nut allergies hold you back! A simple swap makes these treats accessible for everyone. -
Dairy-Free: Replace whole milk with almond or oat milk along with coconut cream for an equally luscious pudding.
This dairy-free version maintains the creamy texture while accommodating dietary preferences, letting everyone join in! -
Sugar-Free: Try using sugar substitutes for both the brown sugar in the apple filling and the caramel drizzle.
This variation allows those watching their sugar intake to indulge guilt-free, enjoying the same delicious experience. -
Flavored Apples: Enhance your apple filling with a splash of lemon juice or a dash of nutmeg to kick up the flavor.
Elevating the tartness and warmth of your apples adds an exciting twist—perfect for adventurous taste buds! -
Spicy Kick: A pinch of cayenne pepper can introduce a surprising warmth to balance the sweetness of the dessert.
This unexpected addition will wow your guests and spark delightful conversations around the table. -
Seasonal Fruits: Substitute the apples with fresh pears or peaches for a refreshing seasonal twist.
These fruits bring their unique sweetness to the cups, offering new textures and flavors that will keep everyone guessing! -
Chocolate Drizzle: Add a drizzle of melted chocolate on top for that extra indulgence.
Pairing chocolate with caramel is an irresistible classic, creating a rich dessert that will leave everyone craving more. -
Cinnamon Swirl: Swirl in some cinnamon into the pudding or apple mixture for an extra flavor punch.
A little cinnamon amplifies the autumn essence, making each spoonful even more comforting and enjoyable.
For more delightful ideas, explore the luscious layers of Salted Caramel Chocolate or dive into a sweet twist with Cheesecake Cookie Cups! Let your culinary creativity shine!
Expert Tips for Mini Caramel Apple Dessert Cups
-
Layer Last Minute: Assemble your cups just before serving to ensure the wafers stay crispy and the layers remain distinct.
-
Watch the Whipped Cream: Be cautious not to overwhip your cream; it should be airy, not grainy. Soft peaks are key for a smooth pudding layer.
-
Chill Properly: For the best flavors, let your assembled dessert cups chill in the fridge for at least an hour. This helps the caramel set nicely too.
-
Check Ingredients: Always read labels for your caramel sauce, especially if allergies are a concern; ensure it’s nut-free for safe enjoyment.
-
Customize Your Layers: Don’t hesitate to play with the flavors! Use your favorite apples or add spices like nutmeg to create personalized Mini Caramel Apple Dessert Cups.
How to Store and Freeze Mini Caramel Apple Dessert Cups
Fridge: Store assembled dessert cups in the refrigerator for up to 3 days. Cover tightly with plastic wrap to maintain freshness and prevent them from absorbing other flavors.
Freezer: Freeze the apple filling and pudding layers separately in airtight containers for up to 2 months. Thaw overnight in the refrigerator before assembling.
Reheating: Since these Mini Caramel Apple Dessert Cups are served chilled, there’s no need to reheat. Assemble just before serving for optimal texture and flavor.
Make Ahead Options
These Mini Caramel Apple Dessert Cups are perfect for busy home cooks who want to save time during the week! You can prepare the apple filling and pudding layer up to 24 hours in advance by refrigerating them separately in airtight containers. Additionally, the crushed vanilla wafer crust can be made up to 3 days ahead and stored at room temperature to maintain its crunchiness. When you’re ready to serve, simply layer the prepped apple filling and fluffy pudding over the crust, drizzle with salted caramel, and enjoy the same delightful flavors as if made fresh! Preparing ahead not only saves time but ensures these dessert cups remain just as delicious for your autumn gatherings.
What to Serve with Mini Caramel Apple Dessert Cups
These delightful dessert cups are perfect for creating a complete autumn dining experience, tantalizing your taste buds and warming your heart.
- Cinnamon Sugar Donuts: Soft, fluffy, and coated in a sweet cinnamon sugar, they add a festive touch that pairs beautifully with the caramel apple flavors.
- Creamy Vanilla Ice Cream: A scoop of vanilla ice cream melts gently into your dessert cup, adding a delightful creaminess that complements the tart apple layers wonderfully.
- Spiced Apple Cider: Warm and fragrant, a mug of spiced apple cider enhances the cozy, comforting vibe of your meal, becoming the ideal beverage companion.
- Caramel-Drizzled Popcorn: Crunchy popcorn tossed in caramel creates a fun contrast in texture, making it a playful addition to your dessert table.
- Gingerbread Cookies: The spicy warmth of gingerbread cookies balances the sweetness of the caramel, perfect for dunking into the pudding layers.
- Pecan Pie Bites: These mini treats bring in a nutty, sweet flavor that effortlessly ties into the fall theme, adding an extra layer of indulgence.
- Caramelized Pears: Sweet, warm, and rich, caramelized pears could be served alongside your dessert for a sophisticated fruit touch that resonates with the apple sweetness.
- Mulled Wine: The aromatic spices in mulled wine turn your gathering into a festive affair and pair harmoniously with the apple flavors in your cups.
Mini Caramel Apple Dessert Cups Recipe FAQs
What type of apples should I use for the filling?
Absolutely! For the best balance of tartness and sweetness, I recommend using firm Granny Smith apples. They hold their shape well and provide a delightful contrast to the creamy layers. Be sure to choose apples with no dark spots for the freshest flavor.
How long can I store the assembled dessert cups in the refrigerator?
You can keep your Mini Caramel Apple Dessert Cups in the refrigerator for up to 3 days. Just cover them tightly with plastic wrap to preserve their freshness and prevent any absorption of odors from other items in your fridge. If you’re making these ahead for an event, this is a great option!
Can I freeze the layers of the dessert?
Yes, you can! To freeze, first prepare the apple filling and pudding layers separately, placing them in airtight containers. They will stay fresh for up to 2 months in the freezer. When you’re ready to enjoy, simply thaw them in the refrigerator overnight before assembling your delightful Mini Caramel Apple Dessert Cups.
What should I do if my whipped cream doesn’t form soft peaks?
Very good question! If your whipped cream fails to reach soft peaks, it’s likely that the cream was not cold enough or it was overwhipped. To fix this, chill your bowl and beaters in the refrigerator for about 15 minutes before whip, then start over with cold heavy whipping cream. Be sure to whip it just until soft peaks form to maintain that lovely airy texture!
Are these dessert cups safe for people with nut allergies?
Yes, they can be! Just be sure to check the labels on your salted caramel sauce, as some brands may contain nuts or be processed in facilities that handle nuts. Opt for a nut-free brand to keep these Mini Caramel Apple Dessert Cups safe for everyone to enjoy. If you’re particularly concerned, using homemade caramel is a great alternative!
Mini Caramel Apple Dessert Cups for Cozy Autumn Indulgence
Ingredients
Equipment
Method
- Prepare the Apple Filling: Combine diced apples, brown sugar, melted butter, and cinnamon in a bowl and let sit for 10-15 minutes.
- Make the Crust: Mix crushed wafers with melted butter until moistened, then press into serving cups.
- Whisk the Pudding: Combine pudding mix and cold milk in a bowl, whisk for about 2 minutes until thickened.
- Whip the Cream: Whip heavy cream until soft peaks form and gently fold into the pudding mixture.
- Layer the Cups: Layer the apple filling and pudding mixture in cups, finishing with pudding.
- Drizzle Caramel: Drizzle salted caramel sauce over the top of each pudding layer.
- Chill: Cover and refrigerate cups for at least 1 hour before serving.
Leave a Reply