
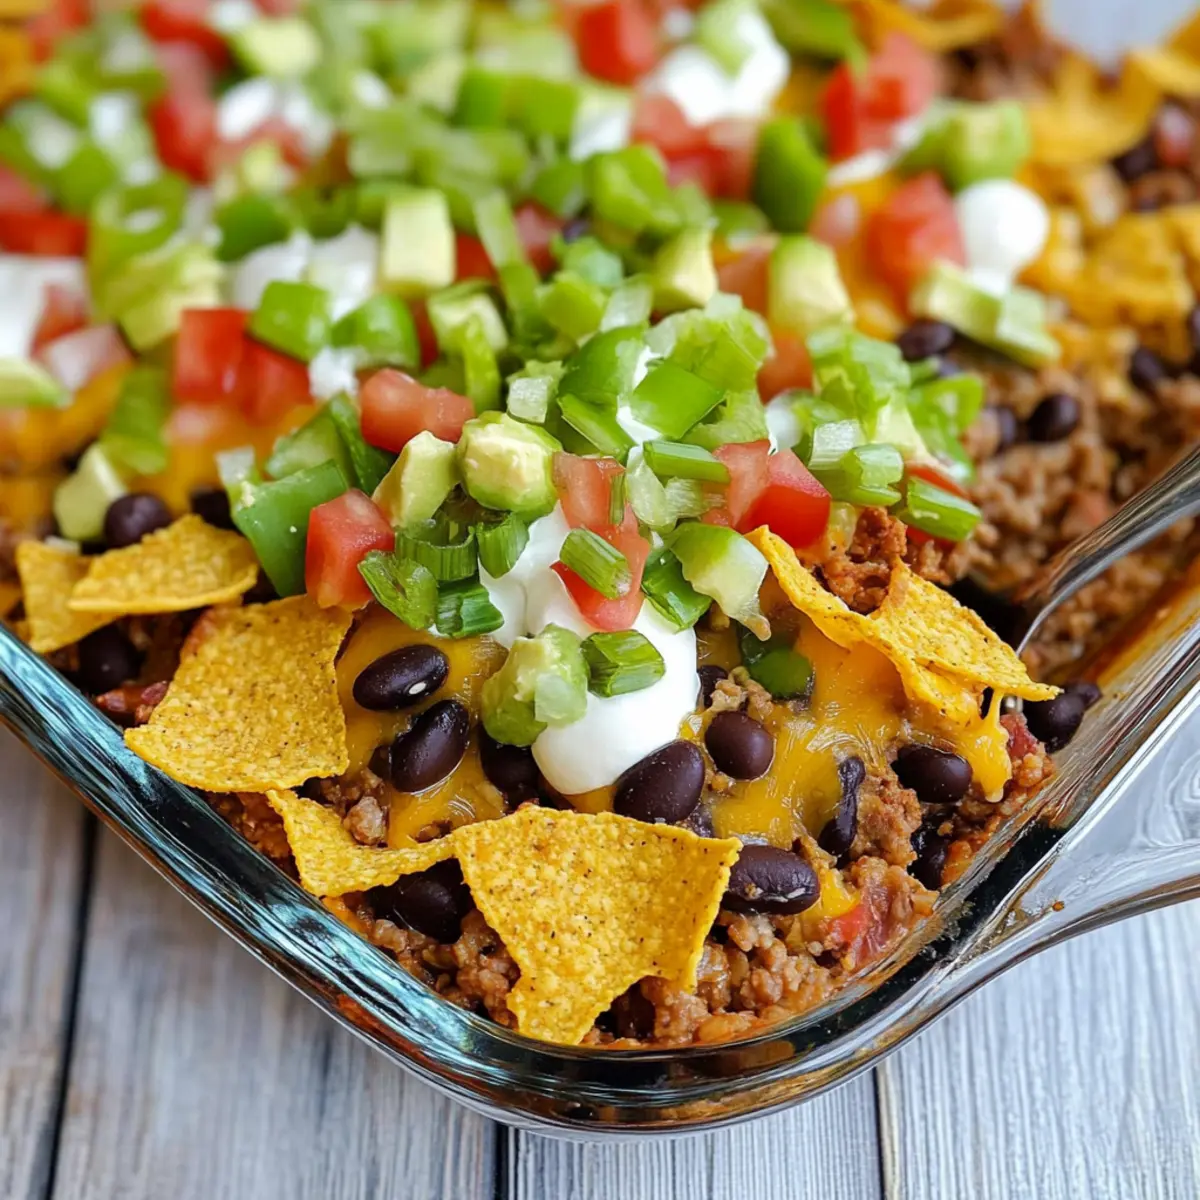
There’s something magical about casserole night, especially when it feels like a mini fiesta in your own kitchen! This Walking Taco Casserole brings all the fun of classic walking tacos into a cozy, crowd-pleasing baked dish. Layered with seasoned ground beef, melty cheese, and a crunchy Fritos topping, this recipe is a perfect solution for a busy weeknight dinner that your whole family will adore. Not only is it incredibly customizable—allowing you to throw in your favorite toppings—but it’s also a time-saver, letting you whip up a hearty meal in no time. Whether you’re feeding kids or appeasing adult palates, there’s an irresistible element to this dish that encourages second helpings. Are you ready to dive into a delicious dinner adventure?
Why is this casserole a must-try?
Simplicity at its finest: This Walking Taco Casserole is a breeze to assemble, making it perfect for busy weeknights when time is of the essence.
Flavor-packed layers: The blend of seasoned ground beef, creamy cheese, and crunchy Fritos creates a harmonious flavor profile that pleases both kids and adults alike.
Customizable toppings: With options like guacamole, salsa, and jalapenos, each person can build their perfect plate, making it a hit at family dinners.
Hearty and filling: This dish is not just a snack; it offers a complete meal packed with proteins and carbs, ensuring everyone feels satisfied.
Make-ahead friendly: You can prepare it ahead of time, making it a practical choice for anyone who prefers to plan their meals. Give it a try alongside our Chicken Stuffing Casserole for a delightful dinner rotation!
Walking Taco Casserole Ingredients
For the Casserole
• Ground Beef – Main protein source for flavor and heartiness. You can substitute with ground turkey or chicken for a leaner option.
• Onion – Adds sweetness and depth to the meat mixture. Chop finely to ensure even cooking.
• Taco Seasoning – Provides essential taco flavor. Use store-bought or homemade mix for convenience.
• Water – Helps to dissolve the seasoning and combine the meat mixture.
• Black Beans – Adds fiber and texture. Can swap for kidney beans or pinto beans if desired.
• Diced Tomatoes with Green Chiles – Adds acidity and spiciness. Choose a can with mild or spicy chiles based on your preference.
• Sour Cream – Contributes creaminess to the filling.
• Fritos Corn Chips – Provides a crunchy base. Feel free to use nacho-flavored chips for extra zest.
• Mexican-Style Shredded Cheese – Offers a gooey texture and rich flavor. Substitute with Monterey Jack or cheddar cheese if you prefer.
For the Toppings
• Green Onions – Adds freshness and mild onion flavor. Slice thinly for beautiful presentation.
• Guacamole – Brings richness and a creamy texture. Homemade or store-bought works great!
• Salsa – Offers a burst of flavor and tang. Select your favorite variety for added personalization.
• Jalapenos – Adds a spicy kick. Use fresh, pickled, or jarred based on your heat tolerance.
With these ingredients, you’re all set to whip up a delightful Walking Taco Casserole that will have everyone asking for seconds!
Step‑by‑Step Instructions for Walking Taco Casserole
Step 1: Preheat and Prepare
Begin by preheating your oven to 350°F (175°C). While it warms up, take a 13×9-inch baking dish and spray it with nonstick cooking spray to ensure easy removal of the finished dish. This will set the stage for a delightful Walking Taco Casserole that’s both warm and comforting.
Step 2: Brown the Meat
In a large skillet over medium heat, add your ground beef and finely chopped onion. Cook for about 6-8 minutes, stirring occasionally until the beef is no longer pink, and the onions are translucent. This step builds a savory base for your casserole, enhancing the flavor and aroma as it develops.
Step 3: Season the Mixture
Once the meat is browned, stir in the taco seasoning and water, bringing the mixture to a boil. Reduce the heat and let it simmer for about 2-3 minutes, allowing the flavors to meld beautifully. You’ll know it’s ready when the mixture thickens slightly and becomes fragrant, filling your kitchen with an enticing aroma.
Step 4: Add the Goodies
Next, mix in the black beans, diced tomatoes with green chiles, and sour cream into the beef mixture. Stir everything together and cook for another 3-4 minutes until heated through. The addition of these ingredients creates a creamy, robust filling for your Walking Taco Casserole that delights the palate.
Step 5: Layer the Casserole
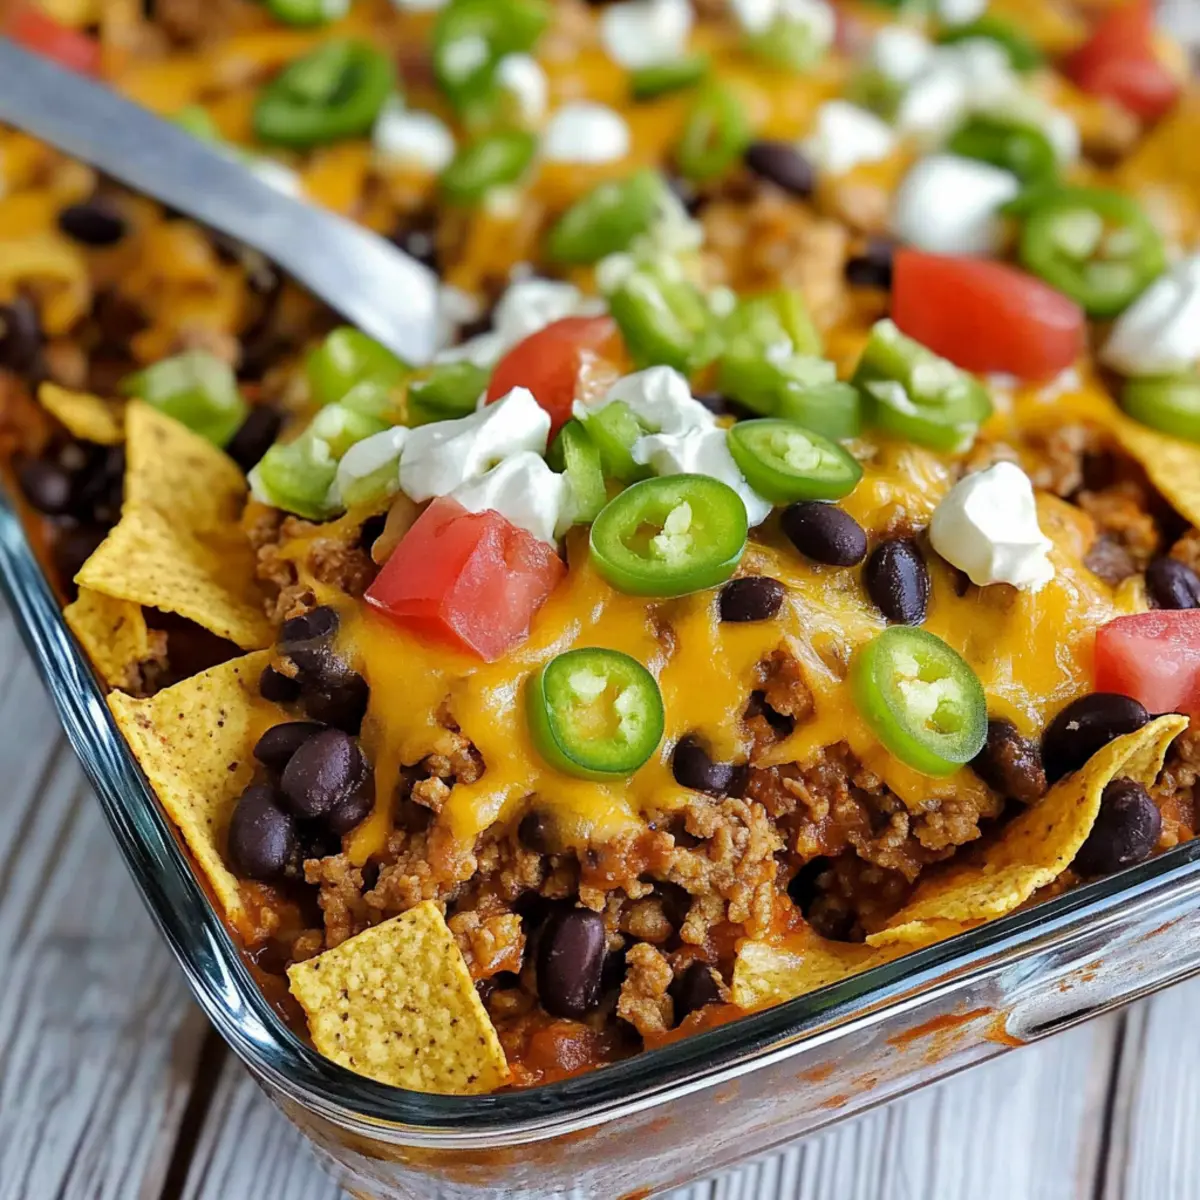
In the prepared baking dish, spread an even layer of Fritos on the bottom. Then, sprinkle 1 cup of the Mexican-style shredded cheese over the chips. Pour the seasoned beef mixture on top, followed by the remaining cheese. This layering process sets up a deliciously cheesy and crunchy texture that will become the highlight of your meal.
Step 6: Bake to Perfection
Cover the dish with aluminum foil and pop it into the preheated oven. Bake for 15 minutes, then carefully remove the foil and bake for an additional 5 minutes, or until the cheese is melted and bubbly. You’ll know it’s done when the top is golden and the edges are slightly crisp, enticing everyone around!
Step 7: Finish with Toppings
Once out of the oven, let your Walking Taco Casserole sit for a few minutes to set. Then, top with additional Fritos and your choice of fresh toppings like green onions, guacamole, salsa, or jalapenos, allowing each person to customize their serving. This final touch elevates your casserole to a festive dish that everyone will love.
Expert Tips for Walking Taco Casserole
• Lean Meat Choice: Use lean ground beef or ground turkey to reduce excess fat and keep your casserole filling without the grease.
• Layering for Visual Appeal: Add an extra cheese layer between the meat layers for a more visually enticing Walking Taco Casserole that melts beautifully.
• Make-Ahead Time: If you plan to prepare this dish ahead, cover the uncooked casserole and refrigerate. Just be sure to add 5–10 minutes to the baking time if it’s chilled.
• Keep It Crunchy: To avoid soggy Fritos, add them on top right before serving rather than baking them, preserving their delightful crunch!
• Flavor Customization: Don’t hesitate to throw in your favorite toppings and vegetables. Adjust the spice level and cheese varieties to make it truly your own!
What to Serve with Walking Taco Casserole
Enhance your family’s dinner experience by pairing this flavorful casserole with delectable sides and drinks that create a well-balanced meal.
-
Crisp Side Salad: A fresh garden salad with crunchy greens and vibrant veggies complements the rich casserole, adding a refreshing crunch to each bite.
-
Zesty Mexican Rice: The mild spices of Mexican rice dish provide an excellent base that echoes the casserole’s flavors while offering a hearty side.
-
Guacamole & Tortilla Chips: Creamy guacamole paired with crispy tortilla chips is a perfect appetizer, inviting everyone to indulge while waiting for dinner.
-
Roasted Corn on the Cob: The sweetness of fresh corn on the cob offers a delightful contrast to the savory casserole and enhances the overall dining experience.
-
Pico de Gallo: Bright and refreshing, this chunky salsa brings zesty notes and freshness, balancing the richness of the casserole perfectly.
-
Minty Lemonade: Serve up a pitcher of minty lemonade that cools the palate while providing a thirst-quenching contrast to the savory dish.
-
Chocolate Chip Cookies: End on a sweet note with warm chocolate chip cookies, creating a comforting and nostalgic finish to your family feast.
Mix and match these suggestions to create the ultimate meal that will have everyone gathering around the table for more!
Storage Tips for Walking Taco Casserole
Fridge: Store leftovers in an airtight container for up to 3-4 days. This ensures your Walking Taco Casserole stays fresh for you to enjoy later.
Freezer: For longer storage, freeze the casserole for up to 3 months. Make sure it’s wrapped tightly in plastic wrap and foil to prevent freezer burn.
Reheating: When ready to eat, thaw overnight in the fridge. Reheat in the oven at 350°F (175°C) until heated through, about 20-25 minutes, or warm in the microwave until hot.
If Assembling Ahead: You can prepare the casserole ahead, cover it, and refrigerate it. Just add an extra 5-10 minutes to the baking time if it’s chilled when you bake it.
Make Ahead Options
Preparing your Walking Taco Casserole ahead of time makes meal planning a breeze! You can assemble the entire casserole up to 24 hours in advance by layering the ingredients in your baking dish, but be sure to keep the Fritos separate to maintain their crunch. Simply cover the casserole tightly with foil and refrigerate it until you’re ready to bake. When it’s time for dinner, preheat your oven and add an extra 5-10 minutes to the baking time if it’s chilled. This way, you’ll have a delicious, home-cooked meal waiting for you with minimal effort after a long day, allowing you to sit back and enjoy the fiesta with your family!
Walking Taco Casserole Variations
Feel free to mix and match your ingredients while exploring new flavors with this delightful casserole!
-
Protein Swap: Use ground turkey or chicken for a lighter version while still achieving a hearty meal.
With these lean proteins, you’ll still enjoy all the flavors that make this dish so irresistible! -
Veggie Delight: Toss in some corn, peppers, or diced zucchini to boost the veggie content.
Your casserole not only becomes more colorful but also adds a delicious crunch in each bite. -
Taco Seasoning Twist: Try a different spice blend such as chili powder or a smoky chipotle to enhance the flavor profile.
This easy swap can turn up the heat or add a new depth of flavor—perfect for flavor adventurers! -
Cheesy Variations: Instead of Mexican-style cheese, experiment with pepper jack for a little kick or gouda for a unique twist.
Imagine the melty goodness infusing your casserole with new deliciousness! -
Crunchy Topping Changes: If you’re seeking variety, substitute Fritos with Doritos or tortilla strips for a new flavor sensation.
This simple adjustment brings a fun crunch to your dinner plate that keeps everyone guessing. -
Bean Options: Swap black beans for kidney or pinto beans for a different texture while still enjoying the nutritious goodness.
Beans are a superb way to add more fiber and heartiness—perfect for satisfying those hunger pangs! -
Spice Level Control: Use mild diced tomatoes for a family-friendly version, or opt for spicy varieties if you’re feeling bold.
Adjusting the heat lets everyone find their perfect balance without losing any of that signature taco flavor!
Embrace these ideas to put a creative spin on your Walking Taco Casserole! You might also enjoy pairing this meal with a vibrant side salad or our irresistible Corn Chicken Casserole for even more delicious dinner options!

Walking Taco Casserole Recipe FAQs
How do I choose ripe ingredients for my Walking Taco Casserole?
Absolutely! When selecting ingredients, opt for fresh ground beef that is bright red with no gray spots. For onions, choose firm ones with a dry skin. If you’re using diced tomatoes, look for cans that are sealed well and don’t have any dents. All these visual cues ensure you’re using high-quality ingredients for a delicious casserole.
How should I store the leftovers of my Walking Taco Casserole?
Great question! Leftovers can be stored in an airtight container in the fridge for up to 3-4 days. This helps maintain the flavors and prevents bacteria from spoiling your delicious creation. Remember to let it cool to room temperature before sealing it up to ensure freshness.
Can I freeze my Walking Taco Casserole? If so, how?
Yes, you can freeze it for future enjoyment! To do this, first let it cool completely. Then, wrap it tightly in plastic wrap and foil to prevent freezer burn. It can be kept in the freezer for up to 3 months. When you’re ready to enjoy it, simply thaw overnight in the fridge before reheating it in the oven at 350°F (175°C) for about 20-25 minutes until warmed through.
What if my casserole turns out too soggy?
Very! If your Walking Taco Casserole ends up soggy, it often means there was too much moisture from the ingredients. To prevent this, make sure to drain black beans well before adding them and consider using less sour cream. You can also add extra Fritos directly before serving to maintain their crunch, which will help absorb some moisture from the filling.
Are there any dietary considerations for my Walking Taco Casserole?
Indeed! To accommodate different dietary needs, consider using ground turkey or chicken for a leaner option. Also, if you have guests who are lactose intolerant, you can substitute dairy cheese with vegan cheese. If you’re concerned about gluten, use gluten-free chips and ensure that your taco seasoning is gluten-free as well. It’s all about making it inclusive and enjoyable for everyone!
How can I make my casserole spicier?
If you want to kick up the spice level, you can use a can of diced tomatoes with jalapeños instead of regular diced tomatoes. Another option is to add a few teaspoons of hot sauce or chipotle powder directly into the meat mixture while cooking. You could also top it with fresh jalapeños as a garnish for an extra kick!

Walking Taco Casserole: A Family-Favorite Weeknight Delight
Ingredients
Equipment
Method
- Preheat your oven to 350°F (175°C) and spray a 13x9-inch baking dish with nonstick cooking spray.
- In a large skillet over medium heat, add ground beef and finely chopped onion. Cook for about 6-8 minutes until the beef is no longer pink and onions are translucent.
- Stir in the taco seasoning and water, bringing the mixture to a boil. Reduce heat and simmer for about 2-3 minutes.
- Mix in the black beans, diced tomatoes with green chiles, and sour cream. Cook for another 3-4 minutes until heated through.
- Spread an even layer of Fritos on the bottom of the baking dish. Sprinkle 1 cup of shredded cheese over the chips. Pour the beef mixture on top, followed by the remaining cheese.
- Cover with aluminum foil and bake for 15 minutes, then remove the foil and bake for an additional 5 minutes until cheese is melted and bubbly.
- Let the casserole sit for a few minutes, then top with additional Fritos and your choice of fresh toppings.
Leave a Reply